With my design finished after Day 1 and having done some colouring and planning for homework, it was time to start framing up my Jacobean crewelwork piece.
Framing up on an embroidery frame is often a very different beast to ‘just’ popping a piece in a ring frame. However, it is worth doing as ring frames can’t hold that much tension on the fabric and even if you get it ‘drum tight’ to start, after a few hours of stitching you end up yanking the material back through the ring, desperately trying to stop it being a saggy, sad mess.
With slate frames, there are no such issues. They will happily keep tension for years, ideal if the average duration of your embroidery projects is a decade, and you can get very even, tight tensions making it much easier to be precise with the stitching.

The whole process is quite involved, as you essentially need to add pieces of calico and webbing to your original fabric (linen twill in my case) to allow you to attach it to the frame. This means a lot of hand sewing to attach the additional pieces of fabric and some bloody fingers as well in my case.
The webbing is attached down the sides for lacing into and the calico is attached at the top so you can sew it to the scrap fabric attached to the roller bars on the frame. The roller bars stretch the work vertically and the lacing provides the horizontal stretch. The roller bars so what the name implies, once you’ve stitched the fabric on you roll them around to start applying the tension.
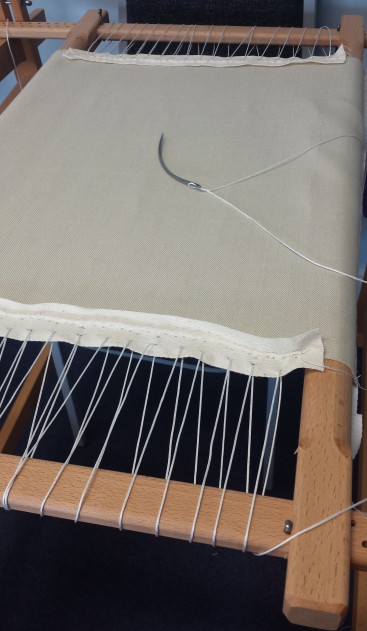
The oversized, vicious looking needle on the middle of the linen there is a bracing needle. There’s a short health and safety talk before you get to use one of these, about keeping the point safely embedded in some cork for storage and making sure to sew down through the fabric so you don’t come up through the fabric and your hand at the same time. They do glide through the heavy webbing though.
I did manage to tie myself into a bit of a knot while doing the lacing, trying to work with longer lengths of cord, so I didn’t have to keep shuffling the cord through the previous holes as I was working, but I got there in the end.
When the work is tensioned up, it’s time to apply the design. The traditional way of doing this is using ‘prick and pounce,’ which involves making lots of little holes along your design lines, sprinkling powder through the holes onto your fabric. It’s messy but what is nice about this technique is it will work on any fabric of any thickness or colour and is much easier than trying to balance your slate frame on a light box to trace a design.
To transfer the design, you lay the pricked design on your work and make sure it doesn’t move. Then you rub the pounce in small circles over all the holes in the design to push the powder through. If you’ve used a bit too much charcoal and are rightly worried about it ruining your fabric, you can remove the excess by turning the slate frame over and whacking the back to knock the excess off.
Then you need to ‘join the dots’ using some watercolour paint to give the design outline. As one of the marking criteria for the RSN is that all the design lines are covered, less paint really is more here. However, even using a size 00 paintbrush with the brush trimmed down and the lightest of touches, it was very difficult to paint over the charcoal. It likes to clog the brush and the unseasonably warm weather meant the watercolours were constantly drying out as well.
After I was finished with the anxiety-inducing painting, it was time to bash off the rest of the charcoal by walloping the back of the fabric. It’s a testament to how well slate frames hold the tension that you really can bash the back of the fabric and it won’t budge at all.
It was finally time to think about some stitching! Generally, pieces are stitched background to foreground in terms of perspective, so what should be closest to you is the stitching that sits on top. As the main trunk of the Tree of Life takes up so much of the design area, I didn’t want it to be too overpowering. I wanted to use a lot of laid work on the central flower and possibly the snail as well, so I wanted it to be some solid stitching to contrast that, so I decided to work it in raised stem band with some colour gradients to give it a three-dimensional feel as well.
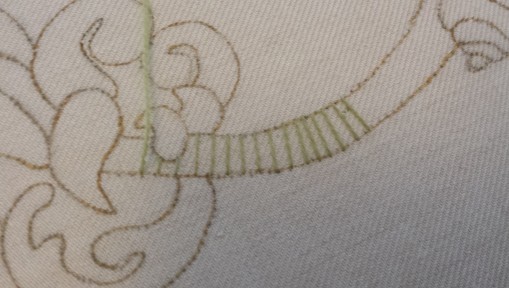
With stitching comes stitch prep, so here’s the beginning of the ladders to hold the raised stem band. I’ve really enjoyed the designing and, asides from the painting, framing up wasn’t too traumatic but I’m looking forward to getting stuck into some actual embroidery.


[…] challenging to keep an even tension on both sides of the frame but the ‘advantage’ of not doing full lacing is that is relatively quick to adjust as you are […]
LikeLike