A while ago, I’d done a beginners tambour beading class, where I’d become hooked on new ways to add all things shiny to my work. As a day was not nearly sufficient time to fully appreciate all the joys and techniques of tambour, I was lucky enough to be able to attend a follow-on workshop to learn some more.
Rather than the design-focused approach to sampling of the Royal School of Needlework classes, the tambour workshop was pure stitch sampling. While I like the idea of working on a design as you’re learning, one of the problems is the beginning of the piece and end of the piece don’t always look consistent as you improve. This makes it far too tempting to start ripping it all out and starting again, which I never do with the care and patience required usually leaving a fluffy, fibrey mess.
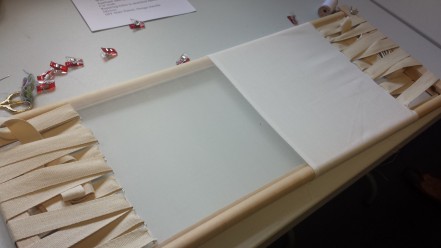
As with any good project, the day started with preparing the frame. Ingenious lesson of the day number one – avoid all the health risks of pins while setting up by using quilting clips to temporarily hold the fabric while you sew it to the frame. The fabric here is half calico and organza, ideal for trialling the quirks of working on different materials all at once. However, this does make it very challenging to keep an even tension on both sides of the frame but the ‘advantage’ of not doing full lacing is that is relatively quick to adjust as you are stitching.
Challenge number one of the day was laying sequins. I still don’t really understand why sequins always feel so awkward to manipulate, especially when all beads seem to be possessed with the spirits of rabid, jumping spiders. Maybe it’s the fact the discs like to stick to each other, or my fingers, or anywhere that is not the place I’m trying to hold them on the fabric… One of the fun parts of sequins though is there are so many different effects you can achieve with them, by changing the degree of overlap, which side faces up or the density of coverage.
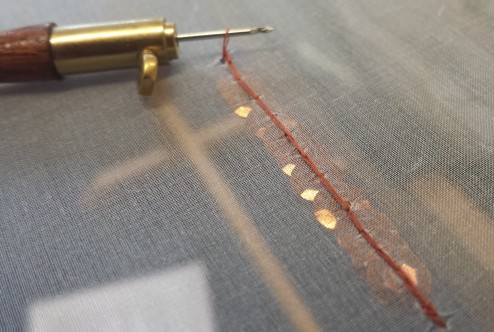
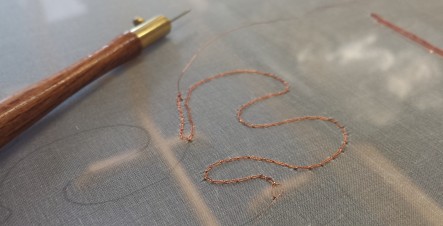
Tambour doesn’t have be all about the embellishments though, there’s a lot that can be done with some pretty thread. We were working on the characteristic Vermicelli patterning, which can be worked either with just chain stitch or with beads/sequins as well. The trick to forming nice, smooth lines is exactly the same as with standard embroidery, varying the stitch length appropriately to the degree of curvature.
On organza, that isn’t too bad but with opaque fabrics, there is the additional challenge of not being able to see what you are doing beneath the frame. This is where you can really see how much muscle memory is actually involved in embroidery – it’s surprising how accurate you can be without ‘seeing’ where stitch will be placed. However, I do find not being able to see an absolute pain when it comes to ‘threading’ the hook. Sometimes it does feel easier to crawl under the frame to do it, but usually just feeling for the hook and thread with my fingers works well enough, even though I usually end up removing some of my skin with the hook in the process.
Even though there are some similarities to other techniques, such as lace crochet, in how to manipulate the hook, and Japanese embroidery, where one hand is kept above and the other below the frame, tambour is a unique beast that definitely has a steep learning curve. I will admit I hadn’t done the hours of practice between the two courses as recommended which was a bad ideas as tambour just feels so wonderfully awkward in the beginning. The failure rate on stitches (e.g. those that magically disappear into the ether because you didn’t quite secure the next one correctly) is fairly high and there’s a lot of stabbing and swearing.
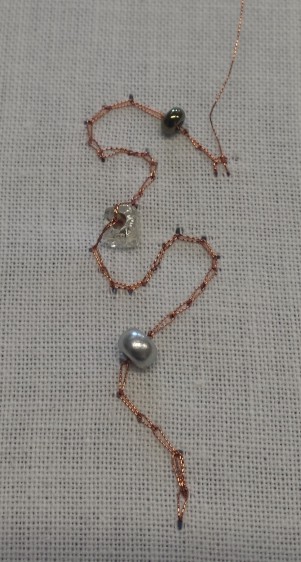
The metallic thread here is metallic Maderia thread, which is very nice to work with for the most part. Especially with the finer, sharper hooks, you have to be a little careful with the hook size to avoid damaging the surface and exposing the core. It is not so stiff that it will hold it’s shape under tension completely but is flexible enough to make it easy to work with.
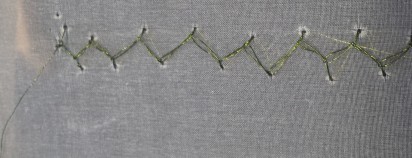
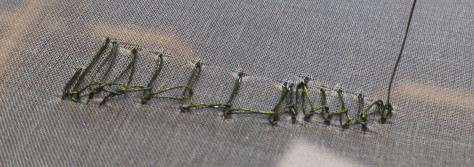
It wouldn’t be an improvers course without making a few stitches that definitely need some improvement. As it is impossible to tell by looking at it, this is an attempt at herringbone stitch. It looks so messy because I didn’t keep the tension consistent or in the correct orientation. Here is another stitch that looks very sloppy similar to buttonhole…
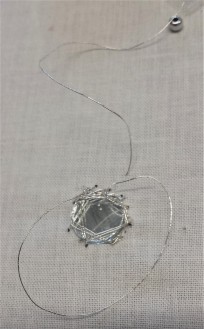
My final failure of the was tackling a Shisha mirror. As mirrors are rather wont to wiggling around while you are trying to secure them, we glued them down to try and make life a little easier. However, I was having such a good day I managed to crack the glue before getting all the securing stitches in place. The processes of making the web of securing stitches to hold the mirror is exactly the same as for hand embroidery but of course, tambour is absolutely unforgiving with stitches coming out.
However, despite all of this, I left eager to have another go and see the other possibilities offered by this awesome technique. I haven’t really experience the benefits of the increased efficiency of tambour versus needle embroidery but I just love the look of the basic chain stitch and would actually really enjoy experimenting with the effects of different thread. Maybe there’s a trip off to Lunéville in my future!

Once again, lovely photographs! I enjoyed your description of beads being possessed by the spirit of rabid jumping spiders 😂 . This all looks incredibly fiddly to me – I’ll stick to painting and watch you do it from afar!
LikeLiked by 1 person
Rather you than me but quite fascinating. Not sure how it works. Do you have a thread below that you pull through with the hook?
LikeLiked by 1 person
I’ll try and explain in words but I think Mary Corbet’s video is probably the best introduction:
You essentially stab the hook through the top of the fabric, while you manipulate all your beads and thread underneath. This means you usually have one hand each side of the frame, and if you’re working with opaque fabrics, you have to hope one hand knows what the other is doing! It’s not as bad as it sounds though, and you can be surprisingly accurate with the hooks.
LikeLiked by 1 person
Wow that is very interesting and amazing the Technique! I enjoyed your cool photos 😀
LikeLiked by 1 person
I’m not sure I’m quite ready for this technique! Lovely work as always, and it does seem quite intriguing!
LikeLiked by 1 person
I promise it’s not quite as bad as I’ve made it sound!
LikeLiked by 1 person
I found this really interesting to read as I have recently seen some lovely tambour work brooches on the internet and was unsure as to how they were made. Thank you – I may have to add tambour work to my bucket list!
LikeLiked by 1 person
Glad to hear it! Good luck with your tambour adventures and you’ll have to share your finished pieces.
LikeLiked by 1 person