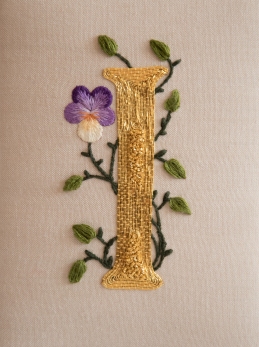
After the RSN Day Class, I still had rather a lot of work to do on my goldwork and silk shading monogram. The stem stitch part was completed but I still needed to finish the raised leaf stitch, the shading on the flower, a lot of couching and some chip work too!
I have to admit that this project spent rather a lot of time on the works-in-progress shelf and I had a few scares where I thought I’d lost the rest of the kit… I had managed to forget exactly which stitch the small decorative leaves were worked in and didn’t have a stitch list or instructions to remind me either. For some reason though, this is the one day class that I had brought along a notebook too and had recorded just enough information to figure out that I needed to do which was rather fortunate. It turns out this is a stitch you won’t find in the Embroidery Stitch Bible, which I think is a sign that it’s sufficiently obscure that one should avoid doing it at all costs.

Determined that now was the time that it would make the transition from WIP to finished project, I set about attacking the couching. One of the downsides about leaving a project for so long is not just forgetting what you’ve done, but it’s also that sometimes you’ve improved a bit since you started. The first row or two of couching on the monogram were pretty wobbly and the rows also weren’t tight against each other which didn’t make the nicest foundation for working against.

Nothing makes perfect like practice though, and the great thing about a piece that you’ve already made a ‘mistake’ on is you’ve already ‘ruined’ it so you can just relax and get on with the stitching. In a way, it’s a shame that so many of the RSN Day Class pieces have such beautiful designs as, when you’re trying a technique for the first time, you can’t really do them justice. I try to think of them as very fancy stitch samplers though, so I don’t end up with embroiderer’s block!

I like couching very much but I was not looking forward to having to plunge this mess later on! For procrastination purposes, I decided it was an opportune time to get on with finishing the silk shading.

The pansy on this piece is simply adorable and I think incredibly effective as it only has 3 purple DMC cotton threads, two pale yellows and then the brighter orange accents in the centre. It’s a nice, straightforward shape to work and very rewarding. I’ve been working on another piece of silk shading recently, which is wonderful, but it is just so slow to work up. Never has a square centimetre of fabric felt so much like a vast, infinite expanse but the little pansy here was a nice antidote to remind me that I don’t hate silk shading at all and it is possibly to finish a motif on a timescale that is shorter than the lifetime of the universe.
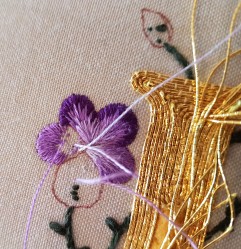
Silk shading is one of the more ‘feared’ embroidery techniques, but if you’re working on a similar kind of design Sarah Homfray, another RSN tutor, has a really helpful Youtube video. I find with silk shading, knowing the theory of how to blend colours and place stitches is all well and good, but the most helpful thing is to see how people actually work their pieces and the kind of stitch angles they use so a live stitch along is just perfect. I have to admit putting the orange accents in was a little terrifying as if it went wrong it was going to go wrong in a very loud and obvious way, but apart from one little runaway stitch, I don’t think it looks too bad.
")
")
")
I was getting a bit bored of fighting a jungle of imitation gold so getting all the ends plunged was starting to look more appealing. While I feel I’m starting to enjoy couching, I’m not sure that moment of terror that comes as you try to coerce the thread to the back of the work with plunging will ever go away.

I had another whoops moment when I was trying to plunge the ends of a rather lively, small piece of the imitation thread in the centre. I managed to jam the needle in the fabric somehow (the eye was a bit large) and, as it refused to budge either forwards or back, I ended up pulling harder and making a nice hole, as well as pulling the entire piece of thread out from under the couching to freedom. Whoops. This wasn’t a fun one to fix!

After that, I had chip work as my reward. Chip work is a very lively activity as you spend most of it running around the room trying to chase pieces of thread that have gone pinging off in every direction. I have started to get better at this but generally me and anything bead-like results in messy disasters, please don’t ask what happened to one of my Spellbound Beads projects when I was in the process of moving.
")
")
While you’re supposed to cut the check relatively square, I went for slightly longer pieces. It doesn’t give quite the same scattered effect as lots of tiny pieces of purl, but each one has more definition and still catches the light in the dazzling way that chip work always does. It’s hard not to love goldwork – the preparation can take a while but all the threads and materials always have so much impact.
")
")
Now for the final surface work, the dreaded leaves and the raised leaf stitch. This is definitely a stitch I feel I don’t really understand how to shape or how to get leaves that look like anything other than thread blobs. I had also lost the piece of card I was originally using to size the stitches so it took one or two attempts to get the sizes of the stitches to match and then, just as I thought I was nearly finished, I had run out of the cotton thread I needed and it isn’t a colour that is commonly stocked by any of the stores near me. I just about managed to salvage enough to finish the last stitch through some good fortune!

I went for a double layer of wadding for the final mounting just to give an even more raised effect. I’m not sure squishy is a word I would normally associate with goldwork but it almost looks cuddly on the mount board. Some of the leaves aren’t great and the couching could use some work but as a learning experience, this piece was wonderful and excellent inspiration for doing some more. I have a few monograms on the go currently but I don’t think this one will be the last I work in gold!


That got really lovely! Wonderful stitching
LikeLiked by 1 person
Thank you so much for your kind words.
LikeLiked by 1 person
Fascinating walk-through of the process and a useful dip into several techniques. I really like the contrast of the smooth couching and the chip work and am very intrigued by the raised leaf stitch. Might be checking that one out!
LikeLiked by 1 person
If you figure out how to get the raised leaf stitch nice and regular and predictable let me know. It was one of those stitches that I felt that I was at the mercy of the thread rather than the other way around.
LikeLike
Beautiful!
LikeLiked by 1 person
This is such a pretty design! I love the combination of colour silk shading and goldwork. Having completed my Certificate goldwork I’m not in any great hurry to try it, or all the plunging again soon, though I do like the effect it gives in the right designs.
LikeLiked by 1 person
How was the goldwork in the end? I’m sure it was stunning like all of your work! I’m going to be starting what will probably turn out to be an overly ambitious goldwork sampler soon so I will be joining you in swearing about plunging (and metal threads that like destroying themselves…)
LikeLiked by 1 person
It certainly wasn’t my favourite design or technique. My main problem was that it had to be ‘just gold’, no other coloured metallic threads allowed. Not my style. I think I’d been better off doing a design that was much more sampler based than trying to do a proper design. I’m not sure proper designs really lens themselves to the ever restrictive brief.
LikeLike
thanks for sharing!
LikeLiked by 1 person
[…] time! This wasn’t the first time I’d used couched threads before (see my Goldwork Monogram) but it all went to a good start when I managed to shred some of the passing thread. Good rule of […]
LikeLike
[…] recipient of my Silk Shading and Goldwork monogram had a custom frame made as I couldn’t find anything in the size and shape I wanted and it’s a […]
LikeLike
[…] I’ve finished a few pieces, including some RSN Day Classwork that has been hanging around with my goldwork and silk shading. There has been some great travelling adventures, including my first trip to South […]
LikeLike
[…] lethargic as, since starting this one, I’ve managed to finish another piece of silk shading and goldwork, as well as start a million more things, but that’s not because I’m not enjoying it. The silk […]
LikeLike
[…] and I was curious as to what this foot had to offer. Normally when you think about couching for hand embroidery, you would create little loops over the thread to hold it snugly in place, without ever going […]
LikeLike