Disclaimer: This post contains Amazon Affiliate links, so I receive a small contribution if you make a purchase through my links. You can find out more about my affiliates policy here.
Durham isn’t often a city I end up passing through, which is a bit of a shame as it’s home to one of the nicest embroidery studios I’ve ever seen, belonging to Tracy A Franklin.
Tracy is a Royal School of Needlework-trained embroider whose work is mind-bogglingly amazing. You can see some of her pieces on her Instagram page here. Her studio is tucked away in a lovely little area by the river called Fowler’s Yard, which is home to range of creative studios and stores, with a conveniently located wool shop for your knitting and fibre needs.
I was very fortunate as Tracy was kind enough to find me space on one of her classes so I could learn all about doing creative metalwork.
Disclaimer: This post contains affiliate links meaning if you sign up to the course from this blog, I get a small commission. However, any recommendations and opinions are my own. For more information, please click here.
August was supposed to be the month of working on some of my big projects, like my two large embroideries, but it seems to be the case that life is very much what happens when you’re busy trying to make plans.
There’s a quotation I can never quite remember, allegedly from a Chinese philosopher, about how if you really want something to be a success you need to put the same amount of effort in at the end as at the beginning. How many of us eagerly dive into projects with high standards and expectations but by the time the last stitches are going in have lost all semblance of enthusiasm?
For embroidery, the final steps aren’t the last few bits of satin stitch, but the process of mounting the piece. Even if you’re breathing a sigh of relief about finally being free of doing two thousand French knots and ready to throw the piece in the back of the cupboard, it’s a process that is worth taking the time to do.
When I finished the ‘Roses Heart’ piece, as it was going to be a gift, I really wanted to make sure the mounting looked professional and well-finished. However, I wasn’t relishing the thought of trying to mount and frame it myself. Poor craft time-management and life chaos meant I didn’t have much energy to devote to running around looking for frames and mounting board either.
Thankfully, help was at hand in the form of the fabulous Deborah Wilding who had agreed to take me through the whole process, from cutting the mount board to getting it into the frame. Deborah graduated from the Royal School of Needlework’s Future Tutors Programme in 2015 and teaches a large number of RSN classes, as well as privately.
Disclaimer: This post contains Amazon affiliate links. For more information, please click here.
When one of my friends announced she was getting married, I knew I wanted to do something special and handmade for her present. When I saw Sophie Long’s ‘Roses Heart’ embroidery kit, I knew I’d found the perfect project.
I first tried ribbon embroidery at one of Sophie Long’s day classes (working on a larger ribbon heart design) and immediately fell in love with the technique. It looks incredibly effective and grows very quickly, ideal for making gifts to a short deadline. Another bonus of ribbon embroidery is you don’t need to obsess over every stitch; if you accidentally fold or twist the ribbon when making flowers, it just adds some variety to their texture and structure rather than looking like a mistake.
One of the main reasons for visiting London was getting the chance to see the Royal School of Needlework’s current exhibition, ‘Peacocks and Pomegranates’, which was also a good excuse to visit Hampton Court Palace as well.
The RSN has been based in Hampton Court Palace since 1987, having originally opened its first studio in 1872. It’s a fitting location for the organisation that does a significant amount of work for the Royal Family and is responsible for the restoration and conservation of many treasured pieces of textile history.
Hampton Court in the distance
Before you enter the palace though, you might want to take the time to visit Creative Quilting, a lovely little quilting shop just before the bridge to the Palace.
It has a great selection of fabrics, patchworking and quilting books and all the assorted paraphernalia you might need. They are also happy to cut fabric from 10 cm widths, so you can get exactly how much you need. I was relatively restrained with purchasing a few Batiks for a scrappy quilt but I couldn’t help but leave with some of this absolutely fabulous Robert Kaufman fabric. Not sure what I’m going to use it for just yet, but it deserves a special project.
15713 Robert Kaufman Japan
If anyone knows a UK retailer with a good range of Robert Kaufman fabrics, please let me know! Having seen Peggy Toole’s Lumia collections, I do want to get my hands on some.
Hampton Court Palace was one of the palaces belonging to the infamous English king, Henry VIII. Although it was originally intended for Cardinal Thomas Wolsey, Archbishop of York, when he fell afoul of Henry’s fickle affections, gifted it back to the king, perhaps hoping he could avoid his downfall.
Day 3 of the Jacobean course came around a lot faster than I had expected. I was a little behind as framing up had taken slightly longer than it should have (tip: when sewing the webbing to the linen twill, it helps to put your stitches through both the linen and the twill.) Today though was all about the stitching.
I had dutifully laid all the ladders along the main trunk of the tree for homework which had taken a surprising amount of time. The main thing is to follow the line of the curve of the design and, in areas where things like the trunk splits in two, keep the design looking matched and continuous.
Today was all about learning as many stitches a possible so I would be able to independently complete various parts of the design. As you tend to stitch back to front, I was quite restricted on what areas I could stitch with the main trunk not being completed. However, we managed to find more than enough to keep us busy.
The main trunk is being worked in raised stem band, which is a really fun stitch to do. After laying the ladders, you then weave the needle over and under each subsequent ladder. It’s a bit easier with a blunt tapestry needle but the fat, fluffy nature of crewel wool means that it’s very easy to accidentally stitch through a ladder rather than around it. The key thing is keeping the tension even in the stitching, enough that the stitches don’t become huge loops but not so much that you distort the bars.
With my design finished after Day 1 and having done some colouring and planning for homework, it was time to start framing up my Jacobean crewelwork piece.
Framing up on an embroidery frame is often a very different beast to ‘just’ popping a piece in a ring frame. However, it is worth doing as ring frames can’t hold that much tension on the fabric and even if you get it ‘drum tight’ to start, after a few hours of stitching you end up yanking the material back through the ring, desperately trying to stop it being a saggy, sad mess.
With slate frames, there are no such issues. They will happily keep tension for years, ideal if the average duration of your embroidery projects is a decade, and you can get very even, tight tensions making it much easier to be precise with the stitching.
A blank canvas
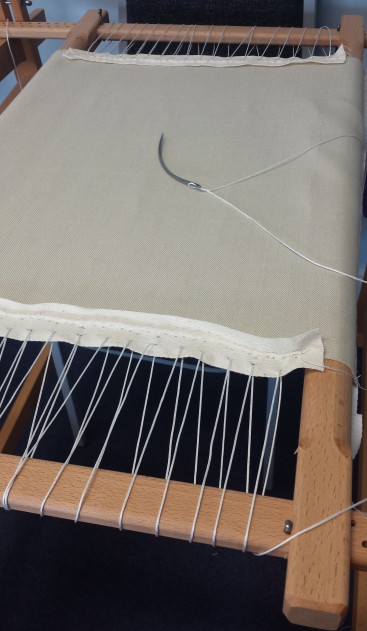
The whole process is quite involved, as you essentially need to add pieces of calico and webbing to your original fabric (linen twill in my case) to allow you to attach it to the frame. This means a lot of hand sewing to attach the additional pieces of fabric and some bloody fingers as well in my case.
The webbing is attached down the sides for lacing into and the calico is attached at the top so you can sew it to the scrap fabric attached to the roller bars on the frame. The roller bars stretch the work vertically and the lacing provides the horizontal stretch. The roller bars so what the name implies, once you’ve stitched the fabric on you roll them around to start applying the tension.
The oversized, vicious looking needle on the middle of the linen there is a bracing needle. There’s a short health and safety talk before you get to use one of these, about keeping the point safely embedded in some cork for storage and making sure to sew down through the fabric so you don’t come up through the fabric and your hand at the same time. They do glide through the heavy webbing though.
Today marks the beginning of my Royal School of Needlework Certificate course with some Jacobean Crewelwork!
Jacobean crewelwork is a 17th century surface embroidery technique that typically depicts exotic flora and fauna and some very comic interpretations of what are allegedly animals. While you do see some squirrels, snails or native English wildlife, many of the beasts were stitched from second-hand descriptions or paintings so are what might be generously described as ‘stylised’.
One things I’ve noticed since I’ve started hunting for Jacobean design inspiration is quite how commonplace it is. Even my own curtains turned out to be Jacobean-inspired!
The beginning of the day involved sitting down and pawing through some of these wonderful books, making a note of any particular designs I liked or wanted to incorporate in my own work. A lot of these books come with their own templates which makes tracing and copying much easier, rather than trying to work out the outline of a shape from the photographs.