Silk shading is a wonderful technique, often better known as ‘thread painting’ for the huge complexity of colours and shading it can involves, for creating very lifelike pictures. Typical subjects are the obligatory twee flowers and wildlife. Bonus points if they wouldn’t look out of place in an English country garden.
Although silk shading is one of the techniques covered in the RSN’s Certificate course, I had already signed up for this day course before I’d decided to do the Certificate and figured there’s no such thing as too much stitching!

I’d done a small bit of silk shading on a previous RSN day class but trying to mimic the colours of the bird was definitely a lot more challenging. The stitches involved in this piece are relatively straightforward, just a combination of split stitch, long and short and satin stitch, but the challenge comes in thinking about how to get enough variation in stitch length and placement to create the ‘feathered’ effect and allow the colours to blend more seamlessly.
The order in which silk shading in stitched is very important to create the sense of depth and perspective for the embroidery. This piece isn’t quite being worked in the correct order as, being a day class, the tutor wanted us to attempt as many different areas of the design as possible to get the most out of the class.
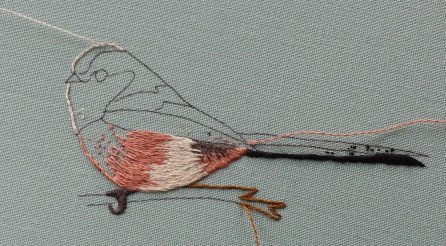
It’s frustrating looking back on earlier areas of the design as I could see my stitching improving as the day went on but I try to have a ‘no unpicking’ rule for day classes. The small designs actually work quite nicely as samplers and are quick enough to finish that they’re good for getting all the mistakes out of your system before moving onto something more labour intensive. I would really like to unpick a few parts of the tail though! It turns out the trick with thin sections is to just let there be large gaps between your stitches and work the satin stitch on a relatively shallow angle, not try and cluster loads of adjacent stitches as, no matter how long they are, it adds a lot of bulk.
What always amazes me is, even when it’s worked in stranded cotton, the threads still catch the light in a way that’s reminiscent of silk. Silk is still probably my favourite type of thread to stitch with but cotton is definitely a lot less hassle to use. Using a single strand means it does take a while to grow but once you stop overthinking the long and short stitches, you can get into a nice rhythm with it. Apparently a lot of people find the complete freedom of silk shading rather intimidating and I have heard it recommended that a glass or two of wine can help with the technique, just don’t spill it on your work!
You can find the kit for this class here. It comes with a very detailed step-by-step guide with loads of information on things like the stitch angles required, so even if you are a beginner, it should be easy enough to follow.

[…] my RSN Silk Shading Day Class, I still had rather a lot of my little birdy to do and having managed to get quite a lot of the […]
LikeLike
[…] poor little Silk Shaded Bird has been in the embroidery hoop for so long that I think I’ve become accustomed to seeing it […]
LikeLike
[…] as the more intensive embroidery qualifications, the Royal School of Needlework (RSN) runs regular day classes as a way for people to try new techniques or get an insight into what it is like to study with one […]
LikeLike