The Internet is a very dangerous place. You head online looking for a couple of embroidery hoops and next thing you know you’ve somehow found yourself with a new tape measure, some needles and… well… a whole new embroidery kit.

Maybe this says something about my atrocious habit of having too many works-in-progress but I never seem to have enough embroidery hoops. I know you’re not supposed to leave things framed up for a long time but I figure if it’s a design where the hoop is on fabric that either be on the back after it is mounted or cut off, it’s nothing worth losing sleep over. I also like keeping a variety of sizes, as while adding extra fabric isn’t complicated, there’s enough prep work with embroidery that there doesn’t need to be more.

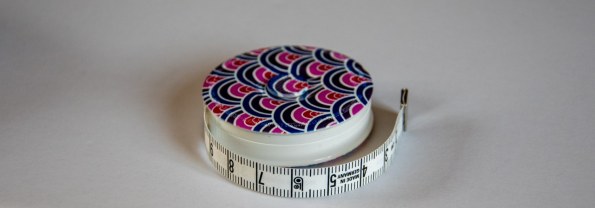
I love working on seat frames for anything that is not so large it needs a full slate frame. They’re portable, light and you can really easily flip the work, stitch from different angles, which is proving a very welcome bonus of my silk shading. Perhaps fortunately, the only place that had all the hoop sizes I wanted in stock turned out to be Lorna Bateman’s online store which may have resulted in some opportunistic shopping, including an indulgent purchase of a Bohin retractable tape measure (highly recommended – it’s really well made and automatically locks roughly every 5 cm).
The more dangerous purchase however, was a Crazy Patchwork Pincushion kit that I couldn’t resist… I’m trying to have a policy of only buying kits when it’s a new technique to learn or something so fabulous it’s a must have as I’d like to spend more time working on my designs but this kit for me fell into both of those categories…
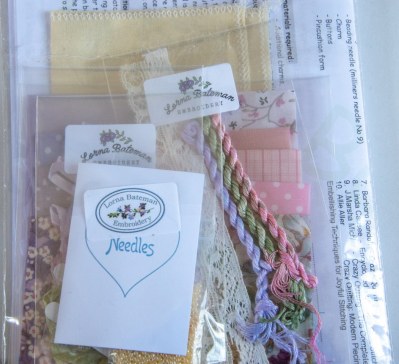
If you have an embroiderer in your life that you love very much, her kits would make fantastic gifts. Everything about them screams ‘designer luxury’ with the kit bag included and the meticulous packaging for every part and piece with labels that are more than an afterthought. I’m really glad the kit came with a full set of needles in a mini-book and that all of them are labelled too. It’s a small touch but it’s evidence of attention to detail that I did appreciate, particularly given the kits are a little on the pricier side.
I’ve wanted to try crazy patchwork for ages but I’ve never felt I really had the right ‘stash’ for it. Maybe the truth is more that my stash isn’t organised enough for finding bits and pieces and assortments would make a fun exercise but I will rectify this one day… Having the fabrics and trimmings included in a kit then seemed like an excellent way to get started and see what the possibilities were.
")
")
")
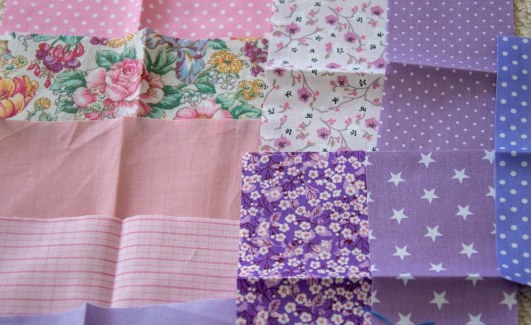
My first impression of the instructions was ‘wow’. They were detailed, lots of additional recommended reading, extensive stitch glossaries suitable for both cotton and silk ribbon stitches. It wasn’t until I really tried to get started that I found some bumps in the road. I appreciate crazy patchwork in particular is supposed to be a technique of ‘look what I found in the scraps’ drawer and mixing and matching to make something fabulously creative. However, what I had expected from the kit is the materials to reproduce what was advertised on the kit photo… This isn’t the case – each kit contains a ‘random’ selection of fabrics on the general colour scheme advertised with the kit, with suitably matched thread and beads.
")
")
Perhaps I should have paid more attention to the line in the description ‘No two will ever look alike as you can add your own little treasures and charms, etc., to make it truly special!’ but I had taken that as an optional extra, not that the kit would be a ‘random’ assortment. Still, despite not being what I was expecting, this seemed like a good chance to turn a kit copy into something more personal and special.

The next problem I had was that the instructions for creating the patchwork ground fabric were not that clear. The example photographs are of a completely different set of shapes and fabrics to those shown on the kit design. Again, not a problem, all of this can be translated but I didn’t find the amount of information for this stage really enough that I was confident I knew ‘how to do things’. I like an incredible amount of hand-holding with kits – I figure if I wanted to have to think about the best way to do things I’d be doing my own design – so this may be more a reflection on my laziness than unclear instructions.
")
")
Thankfully, Youtube to the rescue with this brilliant tutorial from Ivory Blush Roses on nearly everything you need to know. I did opt for being lazy with the seams as I found the amount of fabric with the kit given the size of the pincushion was incredibly generous just to make my life easier and to avoid any cutting-related anxieties. It’s always easier to see where things should have been cut when you’ve managed to create a piece.

The fabrics would not have been something I would have ever chosen but were a good and complementary combination so I had fun playing with different combinations until I realised the pincushion was so tiny I was going to need five or six fabrics unless I wanted to do micro-patchworking. Maybe I don’t handle cottons enough but they were a little on the woefully thin side, making life rather too exciting when I was flirting with dangerously narrow seam allowances.
I didn’t quite put things together as I should have and I underestimated how translucent some of the cottons were but I hope by the time the embroidery goes on this will be disguised as added ‘texture’ and I can claim it was intentional. The kit instructions are much more comprehensive from here on and I think I have done the most important step now – having a go and see what happens.
I machine pierced the patchwork mostly for convenience and as I wasn’t that confident I was sewing the seams correctly I didn’t want to have to rip out machine sewing lines but I think I start to see the appeal in hand quilting. It’s much more dynamic to have the full feel of the fabric and, while it’s harder to be precise then when everything is clamped down but its more personal and engaging.
We’ll see how my piercing holds up as the ground fabric but I am looking forward to embroidery doodling time with this one!

That is a gorgeous kit! It’s a shame it didn’t turn out to be what you were expecting, but your piecework ground is already looking lovely. Can’t wait to see what you do with your embroidery and embellishments 🙂
LikeLiked by 1 person
I am very excited about the next parts…. bling!!!
LikeLiked by 1 person
Yay!
LikeLiked by 1 person
It really does look gorgeous and such a shame that the piecing side of it wasn’t quite right. Ivory Blush Roses is a blog I’ve followed for years and years and some of the work she does is stunning. Well worth a further browse!
LikeLiked by 1 person
It was one of those blogs I found where my first thought was ‘I wish I’d seen this before’. I really like her video tutorials – few people manage to come across as ‘friendly’ in the video format. Maybe it’s just her repeated insistence ‘it doesn’t have to be perfect’ that appeals to me.
LikeLike