Jacobean Crewelwork: Day 3

Day 3 of the Jacobean course came around a lot faster than I had expected. I was a little behind as framing up had taken slightly longer than it should have (tip: when sewing the webbing to the linen twill, it helps to put your stitches through both the linen and the twill.) Today though was all about the stitching.

I had dutifully laid all the ladders along the main trunk of the tree for homework which had taken a surprising amount of time. The main thing is to follow the line of the curve of the design and, in areas where things like the trunk splits in two, keep the design looking matched and continuous.

Today was all about learning as many stitches a possible so I would be able to independently complete various parts of the design. As you tend to stitch back to front, I was quite restricted on what areas I could stitch with the main trunk not being completed. However, we managed to find more than enough to keep us busy.

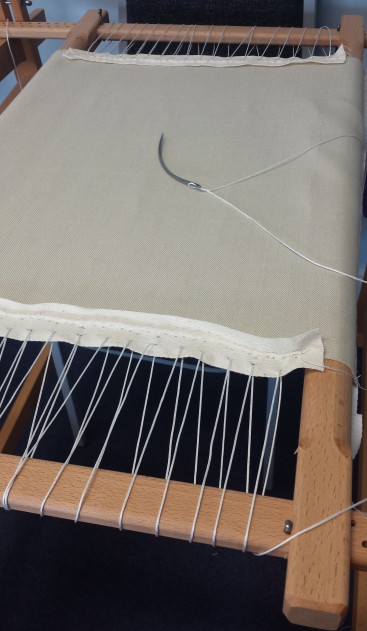
The main trunk is being worked in raised stem band, which is a really fun stitch to do. After laying the ladders, you then weave the needle over and under each subsequent ladder. It’s a bit easier with a blunt tapestry needle but the fat, fluffy nature of crewel wool means that it’s very easy to accidentally stitch through a ladder rather than around it. The key thing is keeping the tension even in the stitching, enough that the stitches don’t become huge loops but not so much that you distort the bars.

1.jpg

Read More »

Jacobean Crewelwork: Day 2

With my design finished after Day 1 and having done some colouring and planning for homework, it was time to start framing up my Jacobean crewelwork piece.

Framing up on an embroidery frame is often a very different beast to ‘just’ popping a piece in a ring frame. However, it is worth doing as ring frames can’t hold that much tension on the fabric and even if you get it ‘drum tight’ to start, after a few hours of stitching you end up yanking the material back through the ring, desperately trying to stop it being a saggy, sad mess.

With slate frames, there are no such issues. They will happily keep tension for years, ideal if the average duration of your embroidery projects is a decade, and you can get very even, tight tensions making it much easier to be precise with the stitching.

1
A blank canvas

The whole process is quite involved, as you essentially need to add pieces of calico and webbing to your original fabric (linen twill in my case) to allow you to attach it to the frame. This means a lot of hand sewing to attach the additional pieces of fabric and some bloody fingers as well in my case.

The webbing is attached down the sides for lacing into and the calico is attached at the top so you can sew it to the scrap fabric attached to the roller bars on the frame. The roller bars stretch the work vertically and the lacing provides the horizontal stretch. The roller bars so what the name implies, once you’ve stitched the fabric on you roll them around to start applying the tension.

2

The oversized, vicious looking needle on the middle of the linen there is a bracing needle. There’s a short health and safety talk before you get to use one of these, about keeping the point safely embedded in some cork for storage and making sure to sew down through the fabric so you don’t come up through the fabric and your hand at the same time. They do glide through the heavy webbing though.

Read More »

Jacobean Crewelwork: Day 1

Today marks the beginning of my Royal School of Needlework Certificate course with some Jacobean Crewelwork!

Jacobean crewelwork is a 17th century surface embroidery technique that typically depicts exotic flora and fauna and some very comic interpretations of what are allegedly animals. While you do see some squirrels, snails or native English wildlife, many of the beasts were stitched from second-hand descriptions or paintings so are what might be generously described as ‘stylised’.

One things I’ve noticed since I’ve started hunting for Jacobean design inspiration is quite how commonplace it is. Even my own curtains turned out to be Jacobean-inspired!

5.jpg

The beginning of the day involved sitting down and pawing through some of these wonderful books, making a note of any particular designs I liked or wanted to incorporate in my own work. A lot of these books come with their own templates which makes tracing and copying much easier, rather than trying to work out the outline of a shape from the photographs.

Read More »

RSN Silk Shading Day Class

Silk shading is a wonderful technique, often better known as ‘thread painting’ for the huge complexity of colours and shading it can involves, for creating very lifelike pictures. Typical subjects are the obligatory twee flowers and wildlife. Bonus points if they wouldn’t look out of place in an English country garden.

Although silk shading is one of the techniques covered in the RSN’s Certificate course, I had already signed up for this day course before I’d decided to do the Certificate and figured there’s no such thing as too much stitching!

silkshading_bird11.jpg
Just getting started.

Read More »

Starting out with the RSN

We are very lucky in the UK to be home to the Royal School of Needlework (RSN), an organisation which describes itself as an ‘international centre of excellence for the art of hand embroidery.’ As well as being responsible for a huge amount of textile conservation, what this also means is they offer a mindboggling amount of courses on everything from how to sew tassels to study days on underwear. Very tasteful monogrammed underwear of course.

I suffer very much with ‘gotta try it all’ Crafter’s Syndrome.  Spinning, sewing, silversmithing, anything that involves messing around with fibre or colour, I love doing. When I went on an RSN day course a few months ago, I was instantly hooked and very interested in having the opportunity to continue developing my stitching with such excellent teachers. One frustration I often find with picking up new crafts is that it can be hard to find regular tuition to keep pushing and challenging those skills.

Somehow, one thing led to another and I found myself enrolled on the RSN’s Certificate course, looking ahead to endless gruelling hours, trapped at a slate frame.

There’s a lot of fantastic craft work on the internet, more than enough to fill a lifetime’s worth of Pinterest boards but you don’t often see the other end of the process, where French knots bear more resemblance to crushed blowflies than flowers and knitted socks come with extraneous holes as a ‘design feature.’

Trying so many crafts means that I spend a lot of time being a beginner, in the frustrating realm of stitches that never sit quite right. I wanted a chance to document the learning process of my time at the trestles and share a bit of what I’ve learnt, and my misadventures in other crafting media, along the way. At least then there will be something on the internet you can point at and go ‘well at least mine doesn’t look like that!’