The pyjama saga has finally come to an end! They are now with the intended recipient, who sadly was too shy to model them for the blog, but they fit perfectly and look fantastic. Great success all around!

The final steps were mostly making the buttonholes, pressing out the material so it didn’t look like it had been in the bottom of a project bag and tidying up any hairy seams that hadn’t quite gone according to plan. There were also a few finishing touches, like sewing in some loops to the top and bottoms, so they can sit on a hanger.

Buttonholes have a, somewhat undeserved, reputation for being really difficult to do. I think it is because they are generally one of the last things you will do on a garment and there is the lingering terror that you’re going to butcher your project and have months more work to do.
It is always a good idea to have a practice of these things, particularly if you’re doing them for the first time. I also recommend trying a sample on the material you will be using for the garment as well – I’ve found machines have a tendency to chew the polyester with dense areas of stitching.


So how do you make a buttonhole then? As sewing machines have moved a long way from the days of the cast iron Singers, there’s a few different methods, with varying levels of automation, for doing buttonholes.
There are a few different types and shapes of buttonhole but they can all be broken down into four components. A bar along the top and bottom and two rows of zig zagging down the sides. It doesn’t really matter which order these are stitched in and it’s often dictated by the machine anyway.
The first step is working out whether your machine does 1 step or 4 step buttonholes. If you don’t know, the manual is proving typically unhelpful or lost, you can usually work it out from the symbols on the machine.

For a four step buttonhole, which can be done with a standard machine foot, you’ll first need to measure your button. Mark the fabric just outside of the button, keeping in mind that if it is very domed or bulky, you might need to make a longer buttonhole.

I found it very useful to draw a centreline as a guide for the machine foot to keep my stitching even. For a four step buttonhole, you manually change the stitch as you work your way around e.g. you set the stitch to sew the bar, then you change for one side, change back to the bar, then change it again to sew the other side.

This was how I did the buttonholes on my pyjamas. However, when I went to use my own machine, it turns out it it doesn’t actually do 4 step buttonholes.
I have a Janome Memory Craft 5900 QC which is a great machine, with lots of fancy options and stitches but other people usually recoil in the horror at the sight of the LCD display. The main disadvantage of a computerised machine is that, if you ever do anything wrong on the machine owing to your own ineptitude, people just panic and blame the computer rather than doing any actual troubleshooting. That is a rant for another post though.
What ‘fancier’ machines do tend to have though is lots of gadgets for trying to make your life easier, and the one step buttonhole is one of them.
First you’ll need to replace your standard foot with the buttonhole foot. You can do this just by popping the foot off with the red quick release button, as you’ll still need this attachment, if you don’t want to unscrew the whole thing. Removing everything does make attaching the foot a little easier.

The first thing you need to do is size up your buttonhole. You do this by adjusting the slider at the back so the button sits snugly in it. My first test buttonhole did turn out to be a little too long for the button in question. When it says to ‘place the button in the back and move the slider so it is tight,’ the emphasis is definitely on the ‘move the slider so you are squeezing the button to death’. Once the button has been sized, you can just remove it.
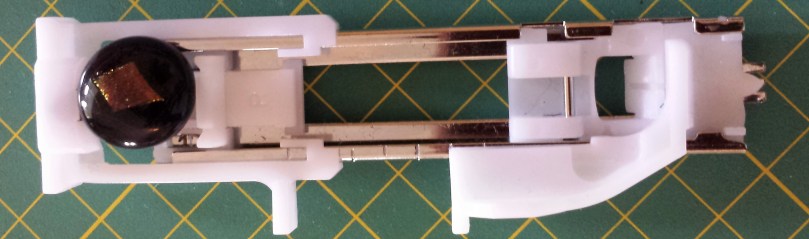
One you’ve wrestled the foot onto the machine, there’s one more step before you’re ready to start sewing. There’s a small lever, near the thread cutter, that needs to be down when you’re using the buttonhole foot. If you try to stitch without it, the machine will make angry beeping noises at you and display an error picture on the screen. The diagrams in the manual aren’t great so hopefully these photos will help you locate it.


Now it’s time to sew! This is where the Janome caught me completely off guard as I wasn’t expecting it to stitch top to bottom from the start point for whatever reason. You want to align the material so that you are in the centre of the bottom bar to start and the machine will then work the stitch with no further input for you. You sit there, feeling rather redundant, with your foot on the pedal and just wait for it to finish.
Before the machine does the final zigzag on the right, it puts a line of straight stitching underneath (hence the strange route in the photo) and will automatically stitch up and down a few times in the corner to secure your stitching.

I’m sure for advanced machinists, the two methods are much of a muchness but my vote definitely goes to the automatic buttonhole maker for the finished results and ease of use. Even on the more slippery fabric, the machine moved it around easily with very minimal guidance from me. I had initially thought that it would be a lot of effort to change feet and use the foot but it only takes a few seconds and you easily save that with not having to manually change the stitch as you would in a four step button hole. I also found on the lighter fabric, after stitching the last bar, it was a challenge to get the fabric to move easily and create an even final zigzag.

When you’re done, just pin the bars of the button hole, get your favourite seam ripper/knife/sharp object of choice to cut down the middle and you’re done, other than tidying up some raw edges. Be careful not to cut the stitching otherwise you’re going to have to do it all again… (or dig out the thread glue…)

What a useful tutorial! Thank you, I hope I remember to come back to this when I finally brave a sewn buttonhole.
LikeLike
Thanks very much. I promise they’re not as bad as a lot of people make out, but if you get stuck, feel free to drop me a message.
LikeLike
Great tutorial!
LikeLike