Disclaimer: This post contains affiliate links. For more information, please click here.
For my previous coasters, I’d stuck to following some great online tutorials. To me though, patchwork seems like one of those skills where it’s far better if you understand the concepts behind constructing a block and can mentally deconstruct patterns, much like making temari, rather than just learning to follow a pattern blindly.

While I love online patterns and am very grateful to all the people who share their expertise in this way, sometimes you can’t beat a good book and I never really like having my computer around while crafting. Paper print always feels more engaging and the construction and ordering of a book often gives you lots of ideas if you are self-studying what things are related or the best order to try and learn in. Plus, book patterns have usually, and I say usually because Interweave has put out some absolute horrors that I can only believe came into existence because the editor had an active vendetta against the writer, been tested and checked for accuracy and clarity.

I’ve picked up a few books on patchworking and quilting over the years, with Scrap Quilt Sensation and The Essential Sampler Quilt Book
being two I particularly enjoy perusing, but I’d never found the kind of reference book that’s an essential in a crafter’s library. Until I found The Quilter’s Bible
. I’ll write a review explaining why I love this book obsessively soon but its tagline sums it up well, ‘the indispensable guide to patchwork, quilting and applique’.
")
")
For my next coasters, I wanted to just ‘go freestyle’ on the coaster construction using The Quilter’s Bible as a reference. I opted for something made from ‘half square triangles’, based on a classic ‘Broken Dish’ block – until I started playing with the colours and placement.
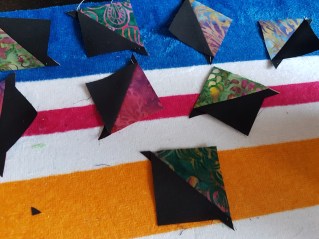
This time to make the half square triangles, I used what the book calls the ‘speed piercing’ approach, which is different to cutting the individual triangles and piercing them together that I’d used in my previous Pinwheel Coaster. Making the two triangles by joining two squares, stitching two seams and cutting down the middle is actually really easy and helped with getting all the points lined up well. Definitely not a trick to be intimidated by!
")
")
")
I enjoyed playing around with different arrangements of the blocks, ending up with something that was actually a replica of my Pinwheel Coaster and something a little different.

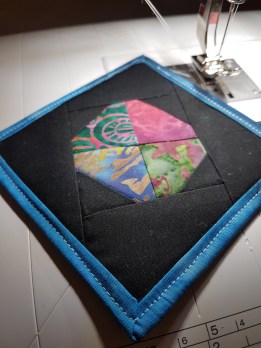
I wanted to add some sashing but to try and liven things up a little, and with my newfound confidence from the hacking and slashing that happened with my Granny Square Coaster, I thought I’d try and liven things up with cutting it on a jaunty angle. It’s a bit weird getting used to using a square ruler to get everything sized up properly but it all went okay in the end.
")
")
I really like the contrast of bright bindings with black and I’d picked up some gorgeous grey/blue fabric for just this purpose. You can also see that, while those mitred corners aren’t perfect, they are significantly improved from this monstrosity! Moral of the story: read instructions that make sense to you, and follow them carefully.

This still wasn’t a coaster to get excited about though. The seams were fine, the binding wasn’t going to induce shrieks of horror upon viewing and the colours were fine to my occasionally strange tastes. So, when in doubt, add bling and practice your free motion quilting!
With the new Bernina, I’ve been exclusively using Mettler threads, and their 0490 Bright Gold really lives up to its name. Metallic threads aren’t always the easiest to use, and sometimes merit a needle change, but the universal needle I was working with was absolutely fine and the stitches were mostly fairly clean except for on a few tight curves where they made some pretty cool effects instead.
")
")
I tend to use a Prym Aqua Marking Pen for marking out cottons, which is sometimes a little too easy to remove even in the absence of water! Apart from that though, they’re nice pens – not as obvious as chalk lines but you don’t have to worry about getting chalk grains everywhere. I just doodled out a design and did my best to follow.

There’s always room for improvement but, for me, just a little decorative stitching really saved the coaster from a life of being distinctly meh. Also, free motion embroidery is a lot of fun and feels like a far more productive way of just doing lazy doodling!

Really pretty and I love the gold thread as well.
LikeLike
[…] was getting a little bored of making coasters but was enjoying being strict with myself and sticking to small manageable projects. Still, fabric […]
LikeLike