After my RSN Silk Shading Day Class, I still had rather a lot of my little birdy to do and having managed to get quite a lot of the main body done had lulled me into a false sense of security as to exactly how long it was going to take.

As I had started the tail in class and thought it looked like a small area to stitch, I decided to tackle that area first. Lots and lots of satin stitch for me to enjoy and more split stitching too. I really enjoy outlining in split stitch but I wish I didn’t have to find the tendency for my stitches to get smaller and smaller until they are sufficiently microscopic they are impossible to split. It doesn’t help achieve a smooth edge or shape once they get too small so I don’t know what I subconsciously consider it worth doing.

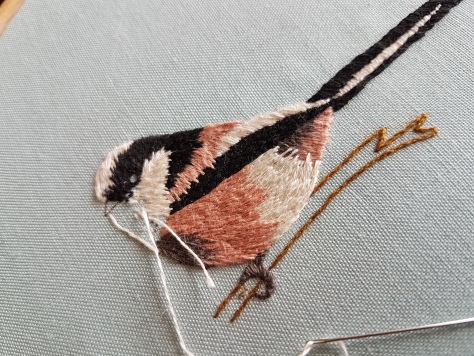
The tail was relatively straightforward to work but got very heavy on the hands when getting the last areas of stitching in. Silk shading is a heavy technique in terms of the stitch density and you might be able to see in some of the photos how, even when being stretched in the ring frame, there’s some evidence of puckering along the top of the tail. At this stage, I wasn’t too concerned. After all, what won’t block out…

I then went back to working the body where I was a little nervous about getting the grey to blend it. Gradual colour changes, like the pansies in my monogram piece aren’t too bad to get to look blended, but a single wrong stitch in contrasting colours can stick out in a very unflattering way. I’d had a few issues with the ecru at the tail end of the bird just looking obnoxious on top of the other colours, rather than blended, but the grey proved much easier to work with. I wish I could say with certainty what the secret was in getting a better effect, I think often more stitches than less seem to help, but sometimes I feel my silk shading is more luck than judgement.

I have to admit it was a relief to finally be done with the body, which makes up the largest portion of the design. Silk shading in the same colour for rows and rows, especially when using short floss lengths, feels like an endless quest of thread changing and monotony. I like the kit but I’m not sure I’ll ever be too excited about using ‘natural’ colours, unless we’re talking the colours of some particularly exotic birds of paradise or nudibranchs. Maybe this is also an argument for moving to some more complex pieces!

Working the wing was very similar to the tail, only having a single colour and larger area to work with made it a bit more comfortable on the hands. The wing is all worked in satin stitch, over the obligatory split stitch outline. As it doesn’t ‘interact’ much with the surrounding areas, it’s just a case of making sure there are enough stitches to not leave any gaps and everything looks nice and smooth with no undamaged threads or escapees on some strange angles.

Silk shading is impressively slow. I think Helen Richman, the designer of the kit, said she could get a piece worked this size in a day… I’m not sure how fast that seems in the context that this long tailed tit measures less than 10 cm from beak to tail. You can see why though even an embroidery expert can’t manage this in five minutes, there are just so many stitches to do!

However, the design is incredibly cute and once I’d found a better rhythm with the piece and decided to treat it as a learning exercise rather than obsessing over every stitch angle, I was really enjoying it. I don’t have enough experience with silk shading yet to always perfect predict how an area of blending is going to work out, or how to modify it to get exactly the effect I want, but when you get an area that looks just fluffy, fantastic and right, it is incredibly satisfying. I think it’s a great sign from a beginners’ kit as well when you just can’t wait to try what you’re learning on something a bit more personal to you.

The back of the bird has a few smaller sections in different colours that are quick to work up. There’s a chance for practicing some smaller, subtle bits of blending too. I wasn’t completely happy with the brown part of the neck to the wing, where the ends of the stitches just look a bit blunt to me on the black, which is a similar issue to what I’d found with the white at the bottom onto the grey and brown areas. Any suggestions?

I thought that I’d got through the bulk of the design when I’d finish the body as he is a rather adorable round little blob but I feel like moving around the head took longer and longer with every section I had completed. This is the problem with false optimism about a project. ‘Oh I’m nearly there!’ – and then six months later what should be a finished piece is still a work in progress becomes it becomes a little demotivating to see the finishing posts running away.

I also started to run into a few issues with knowing quite how to get the dramatic ‘fluffiness’ the original design had. The instructions towards the end of the kit get a little sparse for my tastes. The last few photos all show the completed stitching areas, which gives you a great idea of the order in which to work the piece but not necessarily the best idea of the stitch angle (there is a separate diagram of the angles at the front of the kit guide). There are some breakdowns of the back of the head and cheek areas but I would have liked some clearer guidance on maybe how to work the rows across the larger shape area.
I did resort to drawing some guide lines to try and ensure I kept the stitch angle where it should be but the head still looks a bit blobby to me. However, the rest of the cheek came out just fine and I love his bushy, beardy look. If you look super closely, I started misbehaving a bit on the neck with my stitch angles and rows too and not working them exactly as I was supposed to. It seems to work quite well though for giving a more textured appearance as opposed to the smoother lines I have on the underbelly. I really need to look at some more work in progress examples for silk shading as this for me is the most useful thing for trying to understand the technique.
Then, it was just finishing the eye, the beak and unpicking some holding stitches in the branch that shouldn’t have been there in the first place but I suppose I was feeling more optimistic about my ability to cover them with the French knots that are present in the original design. I decided to opt out of including them, not because I don’t love French knots, but because I felt they stuck out a bit in contrast to the more realistic design of the bird.

Overall, it’s a great design, a great kit (with ample amounts of thread) and I love that it comes with a booklet rather than just some A4 folded paper that is all too easily lost. I was almost reluctant to take this one out of the frame, as it looks so at home there, but that did inspire me to give mounting it as a circular piece, rather than a more typical square, a go…

I’d love to see the final result on this when you’re done – he is very cute! It struck me as I was reading that I have similar issues when I paint: Do I blend shades or sit them side-by-side? Which direction should I place my brush-strokes to best effect? How can I achieve texture without over-doing things? And why is this taking so much longer than I anticipated it would?!
LikeLiked by 1 person
I’ll post soon on the whole mounting process for him which was a lot of fun! I see a lot of sewing tutorials in particular (and cooking seems to be another discipline subject to time contraction…) where they claim it is possible to do this project in 20 minutes. Sure, if someone else cuts everything up for you, you’ve memorised the instructions and know exactly what to do without consulting them again, and nothing goes wrong! Hope things are going well with the print shop!
LikeLiked by 1 person
He’s a very beautiful bird! The thing I’ve found with silk shading is it’s easier to do it reasonably quickly. My RSN piece took forever, and I got better results on the areas I just stitched, rather than the parts I agonised over. It’s a lovely technique but I do think it takes a lot of practice.
LikeLiked by 1 person
I once heard the advice (from an RSN tutor so it’s definitely credible) that silk shading is best done with a glass of red wine, consumed outside of safe spilling distance of the frame. Are there any books you like for silk shading at all? I find a lot of my problems are quite context-dependent, so having someone with lots of experience is helpful but I didn’t know if there were any text references you found were particularly good.
LikeLiked by 1 person
I was given the same advice about a glass of wine! It does definitely help! I’ve not yet found any particularly useful text references. They all seem to be a little light on the problems I had. It will be interesting to see what Marg Dier’s book which is coming out soon will be like.
LikeLiked by 1 person
Really impressive bird. I haven’t got around to tackling such an intensely stitched but this is inspiring.
LikeLiked by 1 person
Awesome bird!
LikeLiked by 1 person
[…] has been a bit lethargic as, since starting this one, I’ve managed to finish another piece of silk shading and goldwork, as well as start a million more things, but that’s not because I’m not enjoying […]
LikeLike