Oh how I’ve missed splashing around with colours and silks. It has been far too long since I’ve had fun playing with dyes, partly out of fear of destroying my deposit for my overly white apartment. The colour scheme for most of the paint isn’t even magnolia, beige or cream, it’s brilliant white and therefore completely unforgiving on all things dirt or dye related… If anyone would like to preempt my future problems and has any advice on removing dyes from surface where it is not supposed to be, please offer away!

Normally when it comes to dyeing top I am terrible and just space dye everything, which makes for great looking top but isn’t really always that practical for spinning. Instead, what I wanted to try and do is systematically dye about 25 g of fibre in a range of colours so I could just blend and mix what I need. While top is great to spin directly from, combing/hackling it makes it even more delightfully fluffy, soft and divinely easy to spin very fine. Particularly when it’s been under acidic conditions, silk top can get a bit ‘tight’, which vigorous thwacking helps with, but it’s much simpler to be consistent with the thickness of the single when I predraft as well.

I still have a lot to learn about dizzing from a hackle but it is one of my favourite prep and blending tools. I bought a Valkyrie hackle, alongside a set of combs from Pipps and Co., who have truly awesome customer service and are one of the few UK suppliers of Valkyrie products. It’s been sadly underused but I’m hoping this little project will change that! If you’re struggling with fibre jamming and large amounts of waste being left on the hackle, the best advice I’ve had is to make sure there isn’t too much fibre being loaded as the back. Even with an extra fine hackle for silk, it can be a slippery beast and hard to load, so I sometimes end up pulling a longer length of fibre through the teeth (to try and spare scraping my hands and fingers too! Ow!) but this ends up with lots caught at the back. A bit of patience, slow working and keeping it to the front really does help, as well as sacrificing a little more fibre to avoid getting slubby, knotted bits in the mixed top.

I’m a bad dyer as I don’t keep meticulous logs and records of my process but it was quite clear that after two or three years some of my dyes were starting to age. Just increasing the concentration of the dyes compensated well enough for this and I should take as a sign to sit down and do some intensive dyeing in the next few months. Even the small 25 g dye pots last quite a long time if you’re not a semi-professional dyer or dyeing huge batches on the regular!
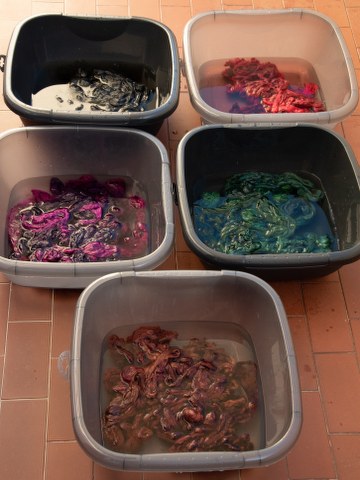
I tried really hard to just use one dye colour per piece of top so I’d have some pure colour samplers but… it didn’t quite work out. I did a particularly terrible job at restraining myself with the purple piece which is a combination of Vivid Violet MX-3B, Raspberry MX-B, a splash of Magenta Red MX-8B and some other mixes. Whoops. The green top is predominantly Bottle Green MX-3G with some Brilliant Emerald MX-G. The black is the ever wonderful Black MX-K and the brown is mostly Chestnut Brown MX-R with some reds mixed in. The red is Cerise Red MX-5B which is forever a disappointing red for me… I much prefer Intense Red MX-GN as, while Cerise Red is supposed to be the better mixer (I can’t remember where I heard this and I’m not sure if I believe it…), it comes out when used pure as a somewhat indecisive, tepid looking red, even when used at a full saturation.
")
")
The other reason some of these colours are a little mute and limp for my tastes are that I didn’t really dye them properly… Procion MX dyes can be used ‘both ways’ – either with alkaline or acid conditions, but if you use them as acid dyes, you’re supposed to heat them to get them to set. Due to being inadequately prepared for my dyeing session, I didn’t have any soda ash, so just used citric acid instead but didn’t steam them as you’re supposed to. I just left them for 48 hours to get on with it.

This works, as in the dye largely sticks as it’s supposed to, (but I can’t comment on whether it has any impact on the lightfastness) but it’s not nearly as wash resistant as just doing things properly, i.e. with heating for acidic conditions or just using soda ash. This is noticeably particularly for the black – Kemtex Black is usually a very deep, pure black (with blue undertones) but the top looks ever so slightly grey, and it was hard work to get all of these rinsed thoroughly, whereas usually I don’t have too many problems with excess dye run off.

The moral of the story is doing things properly is usually a good idea and, while these bits of top might be a little subdued compared to my normal colour palate, they are still perfectly functional and getting our the colour comfort zone is always a good thing. It’s part of why I enjoy the ‘unpredictability’ of painting the silk so much. If you’ll excuse me now, I have some silk to go and pet, and watch this space for some more colourful silks in the next few months.

