My previous fabric box project was a fun one. The little green box is now sitting as a desk organiser for plenty of quilting clips, assorted needles, thread and all the other crafty things that it’s convenient to have at grabbing distance. One thing I wasn’t expecting thought was quite how many nice compliments I would get on it!
Although the box works relatively well, there were a few things I was a bit unhappy with, including some not perfectly matched seams and the flaps looking a bit wonky where they’ve been turned down for sewing. It is surprising how little you notice things like that on ‘functional objects’ as you tend to only see one side at a time. As I only used H640 for the wadding, the box is flexible and deforms when you have too much weight in it which also helps mask any small inconsistencies.
While I liked the squishiness of the last piece and it did have the amusing feature of being like a springy jack-in-the-box when compressed, it’s probably not the feature of a box intended to hold things! I wanted to see if, as well as just generally tidying up the seams and making a more ‘professional’ looking piece, I could find a way to reinforce the structure without making the material too stiff and difficult to handle.
This time I went for H630 wadding, which was a little bit thinner but added in some Vielene interfacing. I’m not entirely sure what grade this is, I think it might be either S320 or S520 which are the medium and heavy weight interfacings respectively.
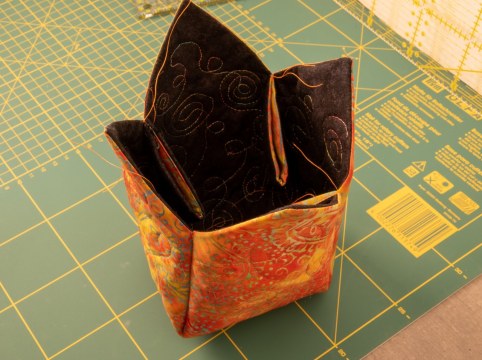
I cut 31 cm squares of the two cotton materials (the rather fetching orange batik alongside the traditional black Moda Spraytime for the inside) and then for reasons which seemed logical at the time, 30 cm for the wadding and interfacing. I had what seemed like a genius idea that this would make my life so much more straightforward with removing the amount of bulk I had in all of my seams but, given how the box is constructed, all the seams you form that involve working through a lot of material involve folding parts together than would be entirely unaffected by this. Whoops. It’s the thought that counts?

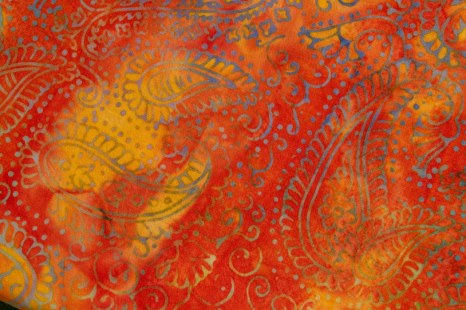
One of the big challenges with this box was deciding what to do with the free motion quilting on it, both in terms of patterns and threads. The batik has a very busy paisley design, of oranges, reds and blues and is very busy. I didn’t want to obscure any of the lovely little design features of compound the busy-ness problem but it was a challenge to find a thread that would match.

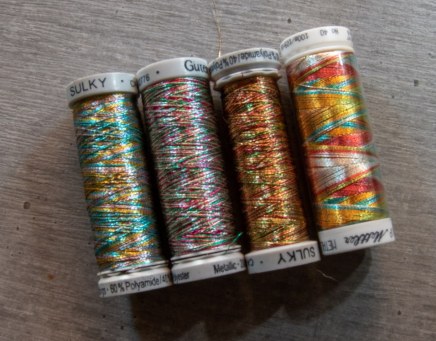
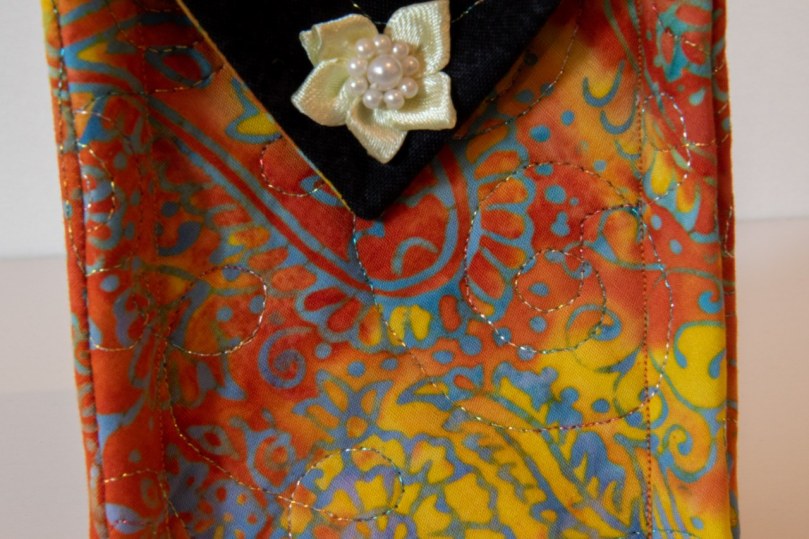
I really like metallics for quilting details, particularly as they show incredibly well against the black background and as I couldn’t think of a good colour match or contrast with the fabric, variegated seemed to be the way to go. I eventually opted for a Mettler metallic 2004 and was going to try something a bit brave – emulating the paisley shapes with the embroidery.
I really like Leah Day’s free motion designs and tutorials and I was somewhat inspired by her calm and control that I too would be able to make wonderful regular shapes for a fabulous box. This is of course where things started to go a bit wrong… Metallic threads can be a pain with sewing machines – they’re usually cored threads, with some type of cotton filament in the middle bonded to a fine metallic foil. This makes them easy to damage and prone to shredding through standard size needle eyes.
For the last box, I’d been using a Gutterman metallic and had minimal problems, but even on my scrap calico piece, I was murdering thread at a rate of every five minutes. I’d get half way through a paisley and then suddenly the thread had snapped, and a few times the needle was taken casualty as well. Every time I got half way through a shape, I’d be back to square one which was immensely frustrating.
Now metallic threads do require some adjustments to work with, so I tried switching to a 90/14 (I have heard great things about topstitch needles for metallics?) that the machine promptly cleaved in two, and then a 100/16 because I was starting to run out of things to use. Dropping the stitch tension did make a positive difference but I found that generally every time I needed to run close or over a previous area of stitching that was it for the poor metallic thread.

I ended up opting for some spirals instead which just magically seemed to work with the same needle and tension settings mostly because it was getting to the stage where my next approach to cleaning a thread jam from the Bernina was going to be throwing it out of the window and suddenly in all the time it took me to cover the whole area of fabric, I only had one or two breakages. I guess there must have been some combination of the movement in the design with the tension that didn’t go too well.
After that, it was straightforward sailing. I didn’t even sew the wrong corners together this time and the Bernina made light work of all the stitching, even with the additional interfacing. I was really pleased with how many of the seams turned out, and maybe the extra stiffness in the fabric meant that most of my edges were far more neat and tidy.
The only thing I didn’t consider properly, and I blame the fiasco which was the quilting stage for this, is the box dimensions. Originally, I had been envisioning something more squat and open, like my previous box, but because of making my folds a bit more shallow, I ended up with a box that was 12 cm tall with a 6 cm inner diameter. I think I sewed the corners around 5 or 6 cm. Not the most practical thing in the world – except that it does perfectly fit a tea caddy – but it’s such a happy, sunshine colour combination that I think it serves a different purpose.
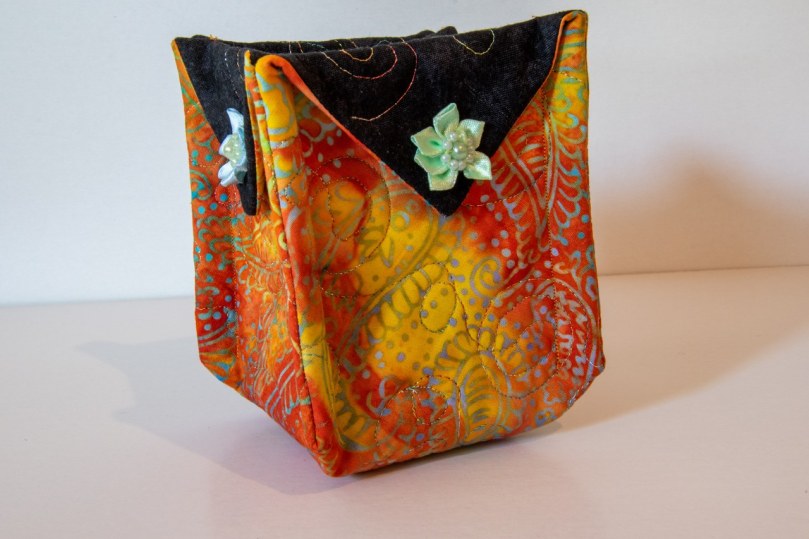
The hand sewing for the flaps was tough enough on the fingers that I did resort to using a thimble but I was pleasantly surprised by how few challenges the inclusion of the interfacing gave me in the construction. This interfacing weight with the H630 is a really good combination – there’s enough weight on the wadding that there’s texture on the quilting and the box still feels like it’s fabric, but it holds it shape and supports itself really well.

Next time I will put some more thought into how to best set up the machine for dealing with metallics and just maybe check my maths so that I don’t end up with a box suitable for holding only pencils, but overall I’m very happy with this one!

Beautiful pouch and box. I love all the metallic stitching.
LikeLiked by 1 person
[…] simple pattern overall. This is the third of these boxes I’ve made – you can see my first and second attempts here and for this one I really wanted to focus on the free motion quilting for […]
LikeLike