It’s been a while since I’ve had the chance to do even a full day craft course, let alone a multi-day one which is always a great treat. As you can probably guess from the number of RSN Day Classes and other pieces I’ve done I find taught classes and workshops really a lot of fun. Thankfully for even what used to be obscure crafts, the international sharing brought around by the internet has made people aware of some of the beautiful work and techniques out there, and I suspect encouraged the publication of ever more specialist texts.

I’ve been really enjoying doing some kumihimo lately, for which there are thankfully quite a few good English language books, many written by Jacqui Carey. I also have a few Japanese books I picked up when I was living there. While I’ve been enjoying playing with different patterns, working up the number of bobbins and new materials, there have been a few things frustrating me, in particular preparing the warps.
When I saw Jacqui Carey had her 2019 class dates up and there was some possibility I could make one of them I was sorely tempted. I’m not too aware of many people teaching kumihimo around Europe (but if you are, please share some names!) so it seemed like a chance not to miss and I am very, very glad I spent two days having not only an incredible amount of fun but also have the chance to really see some of both the technical precision side of kumihimo and something more creative.
_659x960")
_632x960")
The day started with an introduction to the equipment and a little on the history and philosophy of the technique. Like many crafting techniques, the history of kumihimo contains a combination of form and function in the braid design and probably the most famous use of the braids is for the obijime – or the cording that is used to tie the obi (belt) of the kimono together.
Perhaps because of the teaching methods typically employed in Japan, in combination with how many of the local crafts have only been opening up internationally in the last fifty years, there are still plenty of the traditions preserved and some lovely symbolism associated with either the tools or actions as part of the craft. If you ever happen to be in Kobe, you should absolutely take a moment to visit the Takenaka Carpentry Tools Museum, which is a fascinating visit and shows the reverence and respect with which the tools of the trade should be treated. There is also a lovely annual festival, the Hari Kuyou festival – sometimes translated as the ‘Needle Memorial Festival’, where you lay to rest any broken needles or tools for the year and thank them for their good service. It’s a lovely concept!
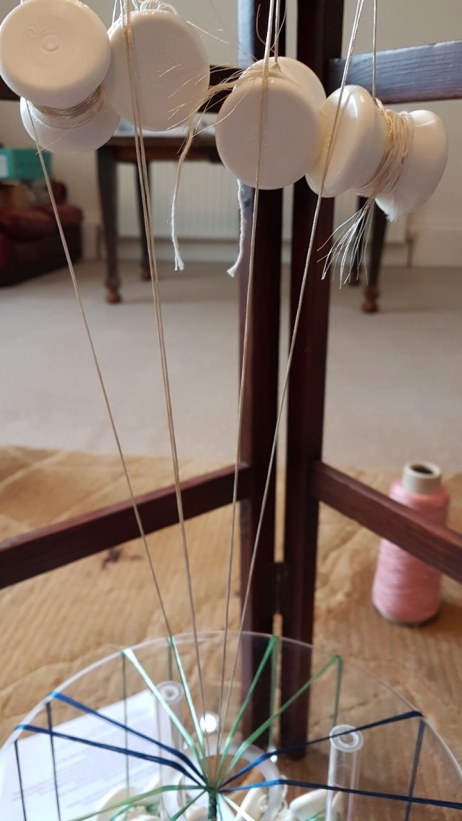
Then, it was onto the braiding, or at least setting up the warp. I’ve written about how, particularly working with metallic Biron, was a source of some frustration to me, despite my love of the material, so I was keen to learn any tricks I could. There are a few different ways of making a warp – using warping pegs as you might for a weaving loom or, if you have something like a premade rope, of dividing the lengths/width as required to wind up a few bobbins all at once. It turns out that, even dealing with metallic threads is ‘easy when you know how’ and that, as I can also attest to from experience, it is always far better to start winding the warp onto the bobbins on the marudai, then trying to move it all.
I think one of my favourite tricks was to not tie on all the bobbins on the start but just when it is necessary so you can braid right to the end of the length to avoid wastage. Especially with a multifilament thread, it’s easy for strands to go amiss so winding and rewinding might be necessary to keep everything neat and tidy. I’ve not found any good ways of correcting one loose filament once I’ve made the braid so better to keep everything under control as you go.
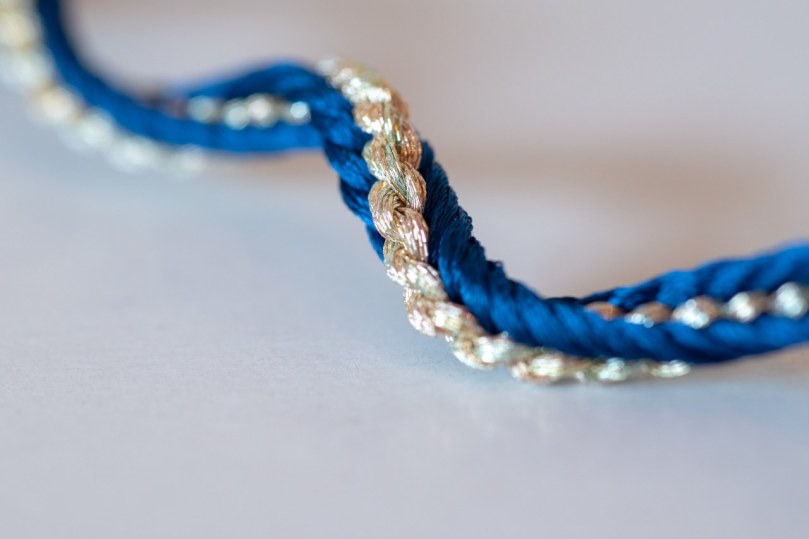
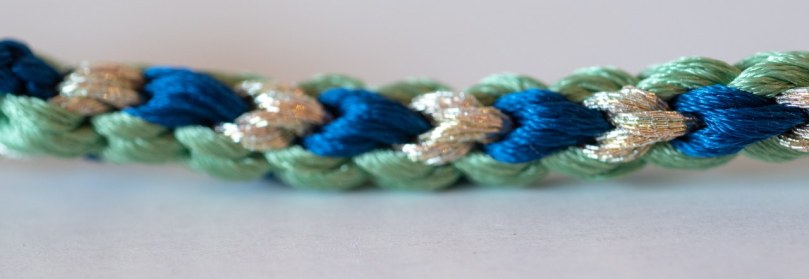
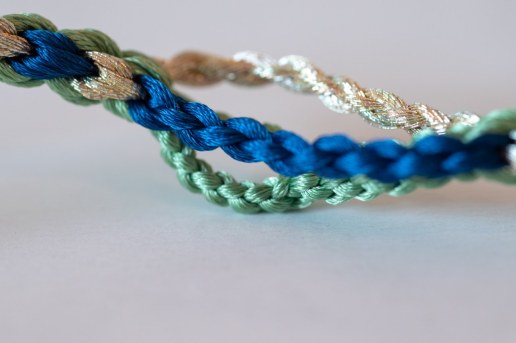
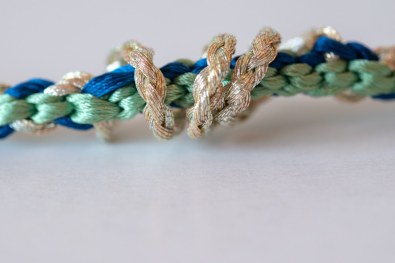
My first challenge of the day was a ‘simple’ one. A nice, eight-bobbin braid in blue and metallics. If you like the pattern, it’s S12 from Jacqui Carey’s new ‘Book of Braids’. The movements look relatively straightforward but it turned out to be almost fiendishly difficult to do. Like most thread-based crafts, controlling tension is really important in kumihimo. Sometimes I feel kumihimo is quite a forgiving craft for beginners, with the right choice of materials, colour and pattern, following the instructions tends to give generally nice results. However, when you really start paying attention to keeping tension fully under control, not letting the point of braiding slide around, even the simplest pattern becomes a challenge!
The S12 pattern is an interesting one because it’s an example of an ‘asymmetric’ pattern. Jacqui Carey has a lot of these in ‘The Book of Braids’ and these are not really traditional kumihimo patterns but are an absolutely wonderful, fun adventure into the possibilities of the marudai. The only thing is the uneven bobbin weights, while they make for some very exciting braid structures, can make the braiding a lot more lively!
It was nice to take a step back to square one and think just about how to move the bobbins, keep everything under control and then deliberately play with the tensioning. This pattern is also very cool as it naturally forms a spiral structure as it goes, thanks to the uneven bobbin placement and I loved the chained ‘spine’ to the braid you can see in the metallic.
_1280x960")
_1280x720")
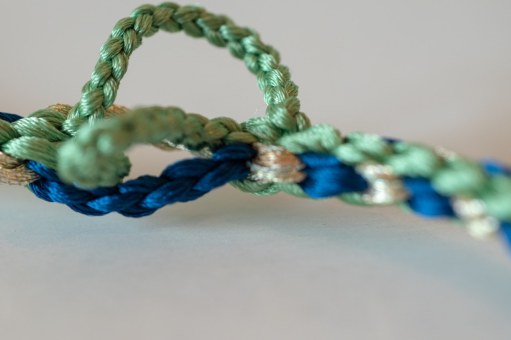
I think I have been a little guilty of sitting in the mindset of ‘find pattern, execute instructions’ without thinking too much about ‘why does this pattern looks like this’, ‘how will this colour arrangement work’. Working this braid was a chance to ditch the recipe book and really start thinking about how each movement works and interacts with each other. My first challenge was to do a ‘split start’ where, rather than working the sixteen bobbins together to make a single braid, I grouped all the colours to start by making three individual braids. This is easy in theory, each pattern just gets worked on separate portions of the marudai, never crossing each other, but can be a bit of brain exercise in practice, trying to partition up the patterns per braid and focus on thinking what the movements are, rather than following a pattern covering the whole circular surface.
Then, three braids because one sixteen-bobbin pattern for a while in a good test of tensioning, before splitting again, initially into 4 braids, but part way through the split section joining the two pale green braids together before going back to a different 16-bobbin pattern. The next fun was using all but four of the bobbins to make a braid, but doing a much longer section in the metallic, that could spiral around the braid formed before the other eight. Kumihimo is very tactile anyway but this was great fun and I think looks incredibly striking.
The next adventure necessitated the inclusion of a wooden frame and pole so I could hang some of my bobbins above the rest on the marudai. An odd thing to do you might think, but this was so I could use some of the threads to make a ‘core’ to braid around. While the texture/structure effects weren’t so pronounced as I was using all the same kind of threads and the same thickness, it is an interesting way of making a colour disappear temporarily and easy to see how it could be useful for reinforcing braids with wire, or making thicker sections etc.
The final section was playing with some unbraided metallics, just wrapping them around sections of the braid as it was growing. I absolutely love the smooth, sweeping effect of the metallics around the braid in this section, and while I can imagine it would be problematic in terms of wear and tear depending on the final use of the braid (as any spinner will tell you, untwisted threads are weak threads!) it’s a fun visual effect.
Making this braid was like doodling with silk, chances to try a bit of this, a bit of that, be mostly free of a pattern and just see how it went. Who said sampling had to be boring? All the little sections came with their own challenges and a chance to think about how the braiding was really working and I feel it was an excellent exercise in loosening me up a bit creatively.

There is something mesmerising about the machine-like precision a master braider can achieve, and for traditional obijime that are often in mute monochrome palates, it is really only the braider’s skill and control that is shouting for attention. The more free-form, creative pieces though have plenty of food for thought and are an interesting contrast as well as being fun to make.
Overall, it was a wonderful, wonderful weekend. It’s been a while since I had the chance to just think about some fibre and I did leave with a haul of Biron, as well as copies of ‘The Book of Braids’ and ‘Creative Kumihimo’. I did have a copy of ‘Japanese Braiding: The Art of Kumihimo’ before, which is a lovely spiral bound book but what I really like about Jacqui’s book is there is not too much duplication of information between books. ‘Creative Kumihimo’ has her amazing ‘grid system’ which is a way of working out what a given colour combination will look like for a certain pattern, with the added fun of you can colour them in to test. It’s also got a great section on a variety of finishes. ‘The Book of Braids’ has Jacqui’s ‘shorthand notation’ which is a way of simplifying patterns into blocks, making them quicker to work, understand and memorise. This is wonderful, but throw in some gorgeous photography, amazing, unique braid designs and lots of detail on the finer points of the braiding process, some fabulous examples of braiding projects and you have a book that will no doubt see many, many hours of use and revisiting.
It would be hard to share the hundreds of little things I learnt and questions I had answered in a blog post, but I’m sure all of that will start creeping into my braids soon enough. I think the sign of a great class is one that leaves your brain spinning over new ideas and feeling liberated to just go and try them all, so for that, this was a very good class indeed! I wonder what ill-advised design choices will be to follow!

Thanks for sharing this wonderful experience! It sounds like a very informative and fun experience 🙂 I have always wondered how some of those elaborate braids are done – very interesting!
LikeLiked by 1 person
It was honestly great, I really need to try and find the time to do some more extended courses because I miss doing it so much.
LikeLiked by 1 person
Fascinating post, as usual! 😊
LikeLiked by 1 person
Thank you 🙂
LikeLike
Absolutely fascinating. Your descriptions always make me want to have a go, whatever the technique and I have to remind myself that I have more than enough on my plate already!
LikeLiked by 1 person
Thank you 🙂 You can always cite me as the bad influence if you need someone to blame for taking up another new thing!
LikeLike
[…] been a bit obsessed with all things cording lately (I blame too much time doing kumihimo) and so when I saw Bernina’s free motion couching foot (#43) for cording on sale I thought it was […]
LikeLike
[…] des Tissus in Lyon and back to the incredible craft markets of Dongdaemun. I went to an incredible kumihimo workshop with Jacqui Carey, which really opened my eyes to the creative possibilities of braiding and I have […]
LikeLike
[…] on the possibilities a craft offers. That’s very much how I felt about the weekend spent with Jacqui Carey, where I finally found the easy way of creating warps (particularly with metallic threads) but also […]
LikeLike