Disclaimer: This post contains affiliate links meaning if you make any purchases via these links, I receive a small commission that contributes to the running costs of the blog. However, any recommendations and opinions in this review are my own. For more information, please click here.
2020 has certainly been a year. I am very much used to living in a perpetual state of chaos with my love of overcommitting myself to all possible things and deciding that one shouldn’t just dream about as many as six impossible things before breakfast, but actually get out and try and do them. What I am not so used to is dealing with a huge amount of external disruption to this chaos-balancing exercise and one of the many things that has suffered along the way has been my attempt to bring order and control to my craft room.

Craft ‘room’ is somewhat of a misnomer in my case as my equipment and fluff spills over into all available rooms. I am very envious of those with either large and spacious enough areas to contain everything to one set of walls, or those with enough sense of self-restraint that they don’t find themselves having to house two looms, a Bernina that demands its own apartment, a spinning wheel and associated spikey preparation tools and fluff mountain, a slate frame and… well… everything else.

Oh, and the books. I love reading, I love books and I love having a reference library. Digital formats are so convenient but there is an inspirational void that comes with a PDF file as opposed to a breathing, tangible object. E-books are an accessibility blessing but I think, unless books are specifically deigned to be viewed in that format, there are a lot of layout issues and small touches that don’t translate to the digital format.
Now we are in September and how I am doing on my dream of having an orderly space with everything within easy reach? It has taken an absurdly long time but I think I am finally a good portion of the way there. There’s some room for optimisation but getting out materials and tools no longer feels like an adventure that involves venturing 50,000 leagues under the sea.
First of all, I did end up needing to buy some new furniture. I’d complained before about my hatred of Ikea furniture and all things white laminate and had been looking quite hard to find second hand furniture with a bit of soul. As someone who is not filled with joy at the thought of shopping (unless it involves a craft shop) and has a very strangely sized apartment with everything needing to fit in nook and crannies, I didn’t have much success, particularly as I didn’t want to commit a large amount of money to an item that may well be back on the road in a couple of years.

I’d been trying to get some ideas on organisation and furniture from Pinterest, which is supposedly the site for all things visual inspiration. While I found most of the organisational tips advice for someone who is much more virtuous and houseproud than me (and probably never does anything other than look at their stash) I did find a lot of custom furniture ideas for exactly the kind of soulless white furniture I so revile.
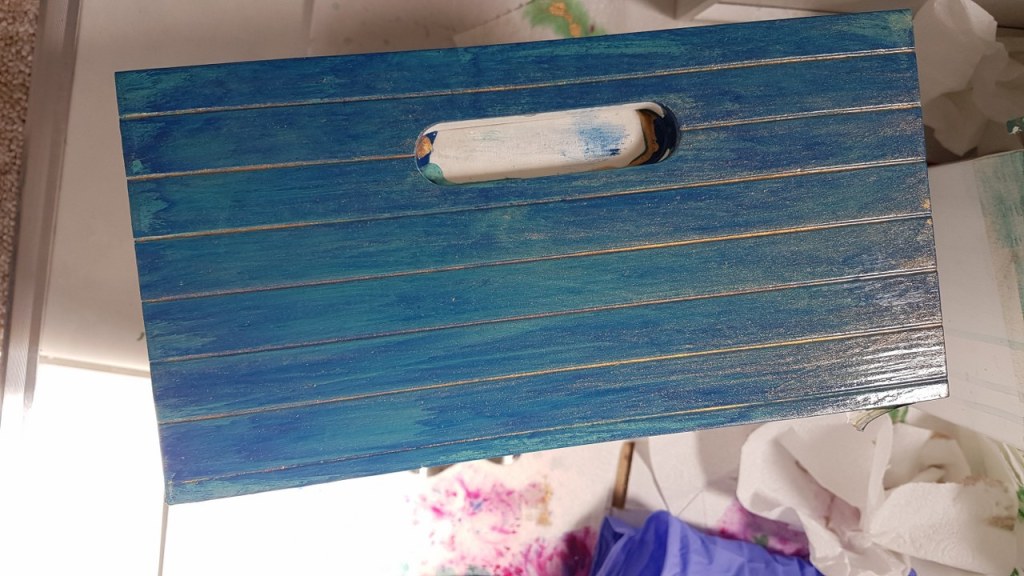
This is how I ended up with a narrow tallboy (or mini-chest of drawers) from the Futon Company, who do seem actually have an appreciation of what it’s like to live in a genuinely small space. The original object was hideous but I had the crazy idea of repainting it, Pinterest-style, to transform it into the furniture I want it to be.
The whole process was much, much less glamorous and much more challenging than the internet would have you believe. It turns out you will need a lot of stuff to just get started with painting (some recommended ‘starter kit’ items from me include: sand paper, variety of grades, paint brushes, stuff to mix paint in…) and the secret to actually good painting is really in tack cloths to get rid of the dust. Dust will ruin everything otherwise.

I ended up using a combination of Rust-Oleum Universal All-Surface in Emerald Green and Cobalt Blue and the gold is their Metallic Furniture Paint. The majority of the coats (because this stuff seems to have horrible coverage…) are Farrow and Ball Vargo and Verdigris Green. If I were to do it again, and particularly if you’re in the UK where ‘chalk paints’ aren’t so much of a thing, I would stick to using exclusively water-soluble paints if you want a blended effect. Acrylics, like the two Rust-Oleum colours I was using, are way more heavy and serious, excellent for fast, good coverage, but for chemical incompatibility reasons, if you want to do something like wet-washing, it is not really going to work as advertised.

My disaster painting trick was to just use a million semi wet-washed layers, try and blend things in and dump layers of gold in between. It would have been better to start with more closely matched colours and perhaps all water-based paints (the darker colours in the acrylic are what give that ‘streaky’ look) but I am very wise in hindsight. I do like how it turned out, and from a distance you can’t even see the bits of dust that got trapped and weren’t sanded away properly…

The other big furniture challenge involved my beloved L-shaped desk. I spent most of my life at the main section but have been using the lower half as a miniature cutting table. The lower half is about 65 cm high, and it seems most standard desks or tables are around 74 cm. I had some vision of getting a table for the gigantic Bernina 790 that could join up to the 65 cm section and be level, so I could potentially have an extended cutting area…
In the end, I did succumb to an Ikea adjustable table as it seemed to be the only desk/table I could find that went low enough. There is an automatically adjustable version of this but as I didn’t intended to change the height that often, I figured manual was good enough for me and actually, it turns out 65 cm isn’t a bad working height for me given the height of the Bernina. Normally I choose whether I can reach the foot pedal or see the sewing area!
It’s hard to get excited by an Ikea desk but it’s tidy enough. I have been debating whether to skirt the desk or not as a way of bringing in some easily hidden storage room underneath. I was thinking something in a rich emerald green but was worried that something not transparent might make the room feel even smaller. I’d also need to think carefully about the construction so the desk was still comfortable to sit at (and handle material at) as it is my sewing spot.

The other piece of Ikea glory is the ‘yarn microwave’ – a custom Bestha which I covered with some printed stick-on wallpaper from FourWall. This piece of furniture was a delight to get together because my floor, walls, and subsequently desk placement, are all not straight. Nothing is level, nothing is flat, so it was a highly multidimensional optimisation problem trying to get the legs adjusted so the whole thing wasn’t a wobbly catastrophe. The glass display for the yarn is a lot of fun – it keeps the dust off and I can still see all those lovely unused skeins, plus I get more hidden storage. Just a note though if you do end up using the custom designer in the Ikea website – it’ll happily let you add handles even though you can’t physically have them on the glass and the door comes with no predrilled holes to add them with no warnings. Not the end of the world but for fellow people with wonky floors, the Ikea ‘push-touch’ mechanisms do not work that well when the cabinet is in an orientation resembling the Leaning Tower of Pisa.
There are still some to-dos, the drawers are still hidden places of shame and I could optimise some other parts of storage but its mostly functional for now and it is really a relief that when I want to do something, I can locate things with almost 90 % accuracy. There seem to be a few bits and pieces that have yet to re-emerge post-move but this has definitely meant more time for crafting and less time wasted on the boring stuff like hunting through cupboards wailing ‘I know it’s there somewhere!’ For those of you unable to nail things into walls, can I also just recommend command strips from 3M? They come with options for with and without hooks and are excellent for sticking posters, or in my case fabrics, up. They’re very good for not damaging paint or leaving grease spots as blu-tack is prone to do.

For my fabrics, I decided to bite the bullet and just buy a lot of small organising containers. I do have some fabrics by a few metre quantities (they are hidden in under the bed storage) but mostly I have a lot of batiks in varying lengths. I grouped by fabric type and whether they were ‘pattern’ or ‘background’ pieces but just to get through the sheer amount of folding and sorting that needed to be done, I wasn’t too strict on the sorting criteria. It turns out the trick is to just make sure whatever fabric size you start with you keep the final fold on the same side (i.e. the top for me) and keep them to roughly the same width and the rest mostly takes care of itself. If you’re more diligent and have less diverse fabric sizes, then this Youtube video is really great.

What did surprise me when wading through mountains of fabric and lots of happy memories of batik souvenirs was that, despite the fabric volume, I have very, very few pieces that I’m still not completely in love with. I was very happy with the basket approach as it ended up freeing up space in the cupboard but it’s not much easier to see all of the collection at once, which is going to be great when it comes to picking colours out. Plus, it’s hard to look at those baskets and not immediately fire up the sewing machine and rotary cutter.
In some of the other baskets I’ve grouped ‘odds and ends’ – so there is one filled with beads, another with trimmings and zips, braiding cord, kumihimo supplies etc. I tried to group by ‘craft’ or ‘type of item’ and it seems to be working relatively well so far.

The fibre and book stash is a little less glamorous but I did put the effort to group books by ‘subject’, which immediately gets very complicated when you have books on multiple techniques. Do the silk shading and goldwork books go with one, the other, or in a mixed embroidery section? Fibres are messily arranged by type and going through this did make me realise that the amount of undyed silk top I have is possibly better measured on a kilogram scale than a gram one… An excellent problem to have. I can dye with impunity! I’ve thrown all my dyed silk colour ranges in a very tasteful cardboard box but most things are in here loose. Spinners, how do you cope for fibre storage? I see good suggestions for small volumes but nothing for more reasonable amounts. This is just about functional, if not about to make it to a Pinterest near you anytime soon.

Other happy news includes being finally reunited with my beloved embroidery stand (maybe I can finish this monogram now without the ridiculous balancing act of books, sofa, table and floor whenever I want to work on it) and my daylight lamp. I have one of the PURElight lamps and I am incredibly happy with it. It’s sturdy, you can adjust the lamp to the brightness setting you need, the illumination is great and the neck is flexible and stable in all positions. The magnifier is nice but I struggle to work with them simply because I’m not used to it. My only complaint is the power cable it comes with is a little short – but it’s a fairly standard type and I guess I’m not the only one with this frustration given you can get a longer replacement. The mini-craft tray and second clip for patterns or a hoop is a good bonus that comes with the 4-in-one version of the lamp.

I’ve brought all my project bags together in a small basket so they’re always in reach and overall, I think trying to get a bit more organised has been a worthwhile investment. I still struggle with the temporary chaos generated from works in progress, which unfortunately at the moment tends to immediately intrude into what is also my work space but I hope that is a situation that will not persist for too much longer… Any organisational tips you’d love to share, dear readers? Do you put all your projects away and to bed every night or leave them out to roam?

Since I have no dedicated space, everything is stored wherever I can but I long to have it all in one place in proper storage – I covet those antique multi drawer plan chests. Perhaps one day…!
LikeLiked by 1 person
They are indeed the dream! I think all living spaces should come with a dedicated craft area…
LikeLike
I don’t have undertake as many activities as you do and don’t have as much stuff but I have a custom built Merchant’s Chest that I found a useful place to store my different yarn and craft supplies. It looks beautiful too. My current projects, mostly crochet, lie around the place in bags or draped on arm chairs.
LikeLiked by 1 person
I didn’t know they had a specific name! Thank you. Merchant’s chests are great – I think I could use a wall size one and I think crochet draped on an arm chair just makes it all the more comfy.
LikeLiked by 1 person
Wow – you are doing an amazing job with your craft storage! I am likewise not in a huge space, so struggle a lot with organizing and keeping things functional. Love the drawers you painted – they look great!
LikeLiked by 1 person
Thank you! I feel your struggle… It’s hard to find ways to keep stuff well-sorted without feeling you need to ‘buy more things’ – I think drawer organisers will be the next thing on the list.
LikeLiked by 1 person
It definitely is! But your new organization system looks great!
LikeLike
I love what you did with the chest of drawers!
LikeLiked by 1 person
I’m still trying to work out how to organise my studio. One of these days… But we did buy a foldaway cardboard desk during lockdown so I could use it for painting on!
LikeLiked by 1 person
Organisation is overrated I think but that desk does sound like fun.
LikeLiked by 1 person
[…] that are not conducive to organisational bliss. I can say that devoting some time (and money) to sorting some crafting space was well-spent and has meant that I lose less time searching and get more time sewing. Finding a […]
LikeLike