I’ve recently discovered the joys of sprinkle dyeing, where the dyeing process is reduced to 1) soak yarn at required pH, 2) dump powder dye directly on yarn, 3) fix dye as necessary. No solutions, no mixing, no syringing. I can actually clean up in less than five minutes after sprinkle dyeing, ideal for a busy schedule, dangerous as I am now drowning in very lurid sock yarns with no time to knit socks.

While roaming around Pinterest one day, I saw some interesting looking fabric that had been dyed using a technique known as ‘ice dyeing’. The name sounds a lot more glamorous and complicated than the technique actually is. All you do is dump a load of ice on your fabric, put powder dye on the ice and wait but, for such an easy technique, the patterns it produces are actually very interesting.
If you need a bit more help on how to do it, Dharma Trading has an excellent tutorial but I do promise it will be some of the laziest dyeing you’ll ever do. I wanted to dye some cotton scraps, so I soaked them in a water/soda ash solution, wrung out the worst of the water, put the ice on top and layered on the dye. Then, I gave it the usual 24 hours to set before rinsing, rinsing and rinsing some more.
As an increasing amount of my cookware collection is slowly being appropriated for dyeing purposes, I wasn’t keen on sacrificing any cooling racks. What I did instead was just lace up the top of one of my dyeing bowls with enough slack so with the weight of the fabric and the ice would sit just inside it. Do make sure the string you use is colourfast and sit the bowl is sat on something plastic as the string will soak up the dye solution as the ice melts and deposit it wherever is most inconvenient. Part of my wall is now a charming Procion Pink for this reason.
If you’re feeling adventurous or short on space, you can combine some tie-dye/shibori techniques by crumpling up the fabric or putting some kind of resist on. The whole purpose of ice dyeing is it gives a very ‘random’ result, as the ice blocks melt at different rates and some areas of the fabric will end up wetter than others, giving you less saturated colours.
As I’m usually aiming to get very saturated colours, I was a little concerned about how soggy the fabric was going to get from all the ice so I did heap the dye on top. As well as feeling very wasteful in terms of dye, the rinsing step was also sufficiently miserable that I suspect all the time you save in the dyeing gets used up in the finishing step.
I will admit, when I first saw the two pink pieces of fabric, I wasn’t too impressed. They’d come out some drab, weird blotchy colour and were looking a bit sad and wrinkly. However, after a lot of time on the ironing board they suddenly started to come to life and you can see some of the lovely mottled effects that the technique gives you. If you look closely at one of the pieces, you can almost see the pattern of the ice cubes in the dye.

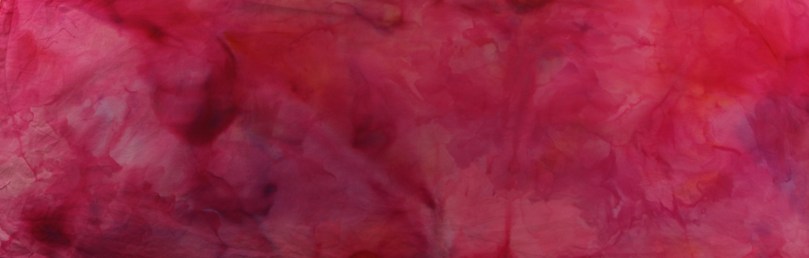
After that, I decided to go a bit wild with colours and, rather than laying my pieces of fabric neatly under the ice, I just scrunched them up and sloshed the ice on top. I ended up running out of ice while I was trying to cover the surfaces but, despite not having great coverage, it seemed to work alright.

I thought as I was using less ice, I would be able to get away with using less dye but I found that, apart from the parts of the fabric that ended up with dye applied directly to them as they had no ice on top, the colours aren’t nearly as intense. However, I love some of the veins and cracks that have come out on the folds of the fabric and the general variation in the colours.

It’s quick, it’s easy but I can’t say I particularly enjoyed all the rinsing or trying to iron out all the wrinkles from the folds. I swear dyeing fabric while it is scrunched up seems to set it into a particularly awful shape to deal with and be very, very careful if you’re ironing dyed fabric where some of the dye is potentially a bit loose. A good bit of steam and loose dye makes for a very colourful ironing board.


Although this cotton is quite thin, I think backed onto some calico it could make for a very interesting fabric for some embroidery or maybe some small little patchwork pieces. I’m quite keen to find a project for this so I have an excuse for doing a little more dyeing!


Interesting, thanks for all the photos of the ice dyeing. I’ve done quite a bit of snow dyeing myself and posted a tutorial in my blog. My method is to scrunch the soda soaked fabric on top of a rack and then layer several inches of snow on top. I then squirt dye solution on top of the snow. Depending on how you squirt the dye on the snow, you’ll come up with different patterns. The effects can differ with the type of snow as well. I’ll have to give the ice a try at some point. Ice can be more handy to have though. Snow is seasonal, although at this very moment there is a ton of it outside.
LikeLike
[…] my fabrics, looking for some scrap to help frame up some embroidery, when I came across some old ice dyed fabrics I made a while ago and was struck by how nice they were. What is also very rewarding about ice […]
LikeLike