After the frustrating mess that was my last zipper bag, I decided the best thing to do was to confront my fears head on and just repeat the pattern again, trying out some different batiks along the way. After all, I had found my zipper foot, and completely understood all the demands of the pattern right?

There were a few key areas I wanted to improve on from the last pouch. The main thing I was unhappy with were the box seams, and I think a lot of the problems I’d had manipulating the fabric and sewing things down were that I was working with an interfacing that was just a bit too thick. Instead of the fluffy monstrosity I used last time, I opted for the H640 interfacing which is still quite thick, but turned out to be much easier to handle and to work with. The final pouch still turned out to be relatively firm and can stand by itself if required, probably aided by the fact that I didn’t completely massacre the box seams this time.

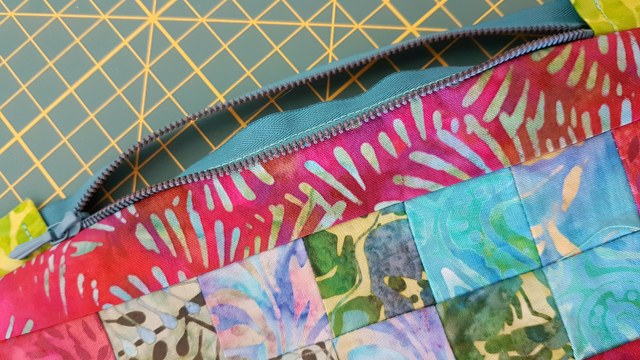
There are a few other small differences I went for, this zipper is an invisible zipper by YKK and is 15 cm zipper (as opposed to 12 cm). The zipper length did require a last minute adjustment as, when I’d made the main patchwork section I realised my measurements didn’t match up and I would either have to make it longer or cut the zip. Two strategically placed ‘framing’ pieces at the end and you’d have thought it was deliberate. My accuracy with piercing still needs work but overall, the main panels went together okay.

I was sure at first about the slightly bold decision of a blue zip (I guess it matches some of the colours in the top batik?) but black would have felt like a much safer choice! I love matching up batiks though, they’re such rich, fascinating fabrics and there are so many cool combinations that are all wonderful in their own way. I think I will be quite content in life if I get really awesome at just doing small squares of patchwork and can make ginormous scrappy quilts with all the colours of the rainbow and fifty more.

I mentioned before that The Sewing Chick’s tutorial that I had followed to make the first bag was actually very good and my annoyance with the previous project was entirely due to my own inadequacies. Second time around I found myself appreciating the tutorial and its clarity much more. I think I only found myself getting out the seam ripper once or twice, rather than after every step! Another thing that I found very useful in getting it all together was a tutorial that really helped me to understand how deep you need to cut the box seams relative to the type of corner/height of item you want.

Apart from some minor room for improvement in getting things looking more professional and generally wishing I was a bit more competent at sewing and patchwork, this pouch went together much more easily. I was delighted when it only took one attempt to get the zip in, sewing very close to the teeth. Isn’t using the correct foot for the job a wonderful thing? However, it did turn out I had dared to stray a little too close to the teeth, as while the zip on this one does work, when it was all stitched together, the zip does occasionally snag the lining and not work completely smoothly. Too far first time, too close second time, maybe the third time I try this it will all work perfectly?


The thinner lining helped enormously in making the box seems look like elegant square corners rather than a puffy mess and it felt like much less of a fight trying to wrangle everything in place to sew all the seams and linings. It is able to stand independently with the H640 interfacing and looks less comical, so unless there’s good reason to swaddle the contents in a protective lining, I think the H640 is a much better choice of this type of project.


This bag was much more encouraging and maybe I will give this project a third run, just to see if things can go even better. Dear readers, have you got any recommendations for small projects with a bit of patchwork in that would be good for learning some new tricks? I really want to try my hand at making some cushions but I’m not sure I want to use that much fabric for patchwork designs until I’m a bit happier with the accuracy of my piercing.


I find it helps to iron the seams in the opposite directions for the blocks you are going to match up. This helps the blocks fit more snuggly together. I also use a pin to help align the seams as well.
LikeLiked by 1 person
Thanks a lot for the tips! I’ve been trying to iron the seams like that but I haven’t been using the pin so maybe that will help. I’m just not very patient with ironing sometimes either…
LikeLike